Return to Loads and Handling Index


Introduction


For details of common packaging materials, containers and commonly shipped goods see
Appendix One - 'Packaging Materials & Containers' and 'Common cargo and standard packages'


In the texts that follow frequent reference is made to the 'stowage factor' of specific goods. This is a measure used by the Merchant Navy and is an estimate of the cubic feet occupied per ton making allowance for lost space (such as that in a loose pile of pig iron or a load of wooden barrels). This figure can be of assistance in the absence of photographic evidence in gauging the height of a pile of cargo in a given wagon. For a comprehensive list of stowage factors see the book Stowage, the Properties and Stowage of Cargo by Captain R. E. Thomas (see Bibliography). The 1930's editions are probably of the most value to railway modellers, I picked up a copy for six pounds using Abe Books, the on-line second hand book sellers.

The stowage factor is a more practical value than the actual volume per ton of the listed goods as it allows for the lost space around the cargo. As an example of how much effect the lost space has on a wagon load scrap metal might be large bits of iron that could range up to 20 cu ft (or more) per ton or densely packed rivet punchings at about 8 cu ft per ton. How difficult it is to settle on a figure for a given cargo may be gauged from the fact that the length of a '12 ton' coal wagon started out at sixteen feet and was later increased to seventeen feet six inches by the RCH, a difference of some 40 cu ft.

For this to be of value a rough approximation of the cubic capacity of wagons is worth having.

Length
of wagon
2 plank 3 plank 4 plank 5 plank 6 plank 7 plank
15 feet
 
120 cu ft 180 cu ft 240 cu ft 300 cu ft 360 cu ft 420 cu ft
16 feet
6 inches
132 cu ft 198 cu ft 264 cu ft 330 cu ft 394 cu ft 462 cu ft
17 feet
6 inches
140 cu ft 210 cu ft 280 cu ft 350 cu ft 420 cu ft 490cu ft
21 feet
6 inches
172 cu ft 258 cu ft 344 cu ft 418 cu ft 516 cu ft 602 cu ft


The stowage factor can give an indication of how high a given cargo can be piled for a maximum load in the wagon but in some cases the full load by weight would then exceed the capacity of the loading gauge and a given consignment might not actually be a full wagon load by weight. An example of the former would be bales of Esparto grass going to a paper mill which would be built up to the maximum allowed by the gauge but would still be a fraction of the load the wagon could carry. An example of the latter might be an order of say ten tons of pig iron (stowage factor about 14 cu ft per ton, hence 140 cu ft) loaded in to a '12 ton' three plank wagon. This load, piled in loose, would cover the floor of the wagon but only where they were piled up (usually about the centre) would it reach the height of the sides.

It should be noted that non-bulk cargo was not simply placed in a wagons, it was packed in, being secured mainly with ropes but also with timber. The packing timber was sometimes nailed to the wagon planks so wagons became rather battered looking with gouges in the top planks where the timbers had been prised off. The GWR had some general goods open wagons fitted with metal 'curb rails' along the top of the side planking to stop people nailing timber to the wagon top. This packing material is technically known as dunnage, in any (pre-ISO container) dock scene add plenty of this as general cargo ships used vast quantities of the stuff.

Another point to note is that wagons were not always filled to the top, it would be quite usual to have a five plank open wagon with a load reaching to only half the height of the sides. Where a large object was being transported it was usual for this ot occupy the entire wagon, even when the object was not particularly heavy. In part this was to do with where the goods were going, each wagon would have a single destination and 'transshipping' from one wagon to another was avoided wherever possible. This was not always practical, on a branch line a wagon might be loaded with goods for a number of destinations, these would then be transferred in the goods yard close to the junction with the main line station, but generally stock was loaded for a single destination.

After the First World War and the introduction of the 'common user scheme' only about 12% of general merchandise wagons on the move were empty. In modelling terms two out of ten general goods wagons might be empty when on the move. Obviously mineral wagons would spend a greater proportion of their time empty although 'back loads' were found for these where possible (for example pit props).

All wagons, goods and mineral, were supposed to be swept and generally cleaned out after unloading but a small proportion of your empty open stock should contain odd lengths of dunnage (packing) timber. There might also be a couple of folded tarpaulins (usually called 'sheets' by railwaymen) or carefully coiled ropes. Modelling and fitting tarpaulins is discussed separately in greater detail. Black ropes seen on ships are coated in tar, ashore ropes are usually brown. Having said this railway company ropes often had coloured strands twisted into them, so the owning company could be identified, and I believe the NER ropes were actually black with a white strand. The deposit charged for use of a company rope to secure a load a few shillings pending its safe return (about a weeks wage for an average working man). Orange coloured polypropylene ropes were certainly in use on BR by the mid 1960's however I am not certain when they were introduced.

Straw was widely used as a packing material for fragile items, the wagon often appearing to be a filled with the stuff with just the tops of the stowed items, or their crates (also filled with straw), showing at the top. I have tried various materials to represent straw, to date the best results have been obtained using the 'lint' recovered from the filter on a tumble-dryer. This is light and fine, the colour depends upon the materials being tumbled, you should find a good range of greys and I got a rather convincing 'heather' colour from a large blue and black bath towel. I have seen references to heather regularly being used for packing iron and steel products into railway wagons. I believe a stock of heather was delivered in an open wagon, with a tarpaulin over the top no doubt. If required you can always colour it with water colour paint to get a yellowish off-white effect. I once experimented with fibreglass insulation and I suggest this should be avoided, it is over scale and it is dangerous stuff if it gets in your eyes, particularly when cut into short lengths. Carpet underlay is frequently mentioned for producing straw, manure etc. I have not tried this myself (I have always used rubber underlay for my carpets) and I have not seen any photographs of N models using the stuff but it is reputed to be effective. I have used my girlfriend's hair for straw, blonde and fine the effect wasn't bad, although technically way over scale. Teased out `hairy' string (if you can find any of the stuff these days) is an alternative, I would not recommend it for N however as it is thick, rather stiff and difficult to pack convincingly.

Earthenware pipes, lavatory pans and the like going to builders yards would be packed in straw, as these items require no protection from the weather a tarpaulin might not be added over the top. The former I made by rolling a strip cut from cigarette paper round a pin and wiping over with PVA wood working glue (if you peer in to the wagon they are hollow). These are painted light brown for earthenware (common after the 1850's) or white for concrete (introduced in the 1940's). If you feel up to it you should add a 0.5mm strip round one end of each pipe to represent the part that will fit onto the next pipe.

For the tops of lavatory pans (packed in straw) the best I have yet made were produced using short lengths of white PVC insulation stripped from multi-stranded electrical wire. An outside diameter of 2 or 3mm is required so Plastruct thick-walled ABS plastic tubing could be used, heat the tube in boiling water to soften it and squeeze it slightly to produce and oval shape. Both lavatory pans and earthenware pipes would often have been carried in open containers of the C or D type as well as in open wagons. Note that these containers, depending on the load, might also be covered with a tarpaulin.

Up to the 1950's a lot of road transport was still horse drawn (the supposedly highly mechanised German Army was still about 70 percent horse drawn in 1939). The railways themselves employed large numbers of horses for delivery work and also for shunting purposes (the last British Railways shunting horses retired in 1967). All these animals required feeding and an impressive load was loose hay (cut grasses) or straw (the stalks of grain plants such as wheat) piled into an open wagon forming a great bulging load covered with tarpaulins. Loose straw was (I believe) a seasonal cargo, being transported from the farms. Two sheets would be required, well roped down over the top and these need not be from the same company.

Combine harvesters leaving a trail of rectangular bales in the fields only became commonplace after the Second World War but hand-cut 'trusses' or bales of hay taken from the piles of hay on the farm (hay ricks) and tied with twine were being shipped by rail in the early 1920's. This would normally be heading for larger towns (London, Manchester, Glasgow etc). These loads were covered with a tarpaulin sheet and the 'roping down' was done over the top of the sheets. Bales or trusses had to loaded as a 'locked load', that is they had to form a stable pile not liable to topple over. In the book Wagons &Loads on the GWR and BR/WR (see Bibliography) there are a series of pictures showing how these bales were loaded into different types of wagon. The load was never more than about two feet taller than the side of the wagon and there was usually a row of bales running along the centreline on the top.

Fig ___ Wagon load of straw bales.

Wagon load of hay bales sheeted and roped

Human hair is on average about 3 thou thick, roughly half an inch in N, so fine hair can be used as rope but personally I prefer varnished 'transformer wire', recovered from transformers in old broken radios (also obtainable on reels from electrical suppliers). Mono-filament fishing line is useful for making ropes but it tends to be a bit springy and gluing it can be problematic (there appear to be different types of materials used for thee lines offer so I cannot give any definite advice on the best adhesive to use).

To represent chain the best I have so far come up with is two strands of fine electrical wire twisted together. I use strands from multi-stranded instrument wire of the type commonly sold in model shops as 'layout wire', but 5 Amp fuse wire is about the same thickness. The best way to twist the wire pairs is to place one end in a vice and grip the other ends in a 'pin vice' or a small chucked hand-drill and twist gently (I have had some success using a vice but twisting the wires with my fingers). When sufficiently twisted clean off with a dry rag or a spot of de-greasant (I use tip-ex thinners which is actually carbon tetrachloride) and coat them with solder. An alternative is to take some fuse wire and squeeze it between the serrated jaws of a vice to produce 'chain links', but the twisted wire method tends to produce a more robust result.

Commercially you can get wire chain with forty loops per inch, this looks the part rather better than my twisted wire but it costs rather more.

With the growth of motor transport and the introduction of the pneumatic tyre from the mid 1930's on old tyres started to become available. By the 1940's they were regularly used for a range of purposes including as cushioning for loads. Short lengths of electrical insulation stripped from wire can be cut up can provide a nice load of used car tyres for a wagon fitted with Peco coke rails, they are simply piled in loose as a rule (this idea is from an article in the N Gauge Society Journal in the 1970s, unfortunately I cannot find the article so canot credit the author).

Any electrical flex with black insulation will do for the job, ideally it should be about 3 mm to 4 mm in diameter. Strip off about four inches (100 mm) at a time by gently cutting round the wire with a knife and sliding the insulation off. Cut this into slices about a millimetre wide for the tyres. You can also use 1mm lengths cut from old ball-pint pen ink tube and painted black. Used tyres from the scrap yard were sometimes shipped by rail, this is a low density load and the 'coke wagon' shown below would be a typical wagon for the job.

Fig ___ Wagon load of old tyres.

Wagon load of old tyres

After the second world war the pallet was introduced, gaining popularity in the 1960s. One early application of palletisation was the shipment of bricks (see Wagon Loads - Building Materials) and the empty pallets had to be returned. One or two wagon loads of empty pallets would be a reasonable addition to a rake of wagons, to model this load you can use Ratio pallets stacked on a home-made insert. The problem with the Ratio pallets is that they are too large, they look better if you trim them down by cutting close outboard of one of the inner trnsverse timbers, reducing the pallet from three to two bays. Even so they are a bit on the large side and you will only get three stacks in a Peco wagon. Modelling an empty pallet load is discussed in the section on Unit Loads. You can make a wagon load of empty pallets, this is not as tedious as it sounds. First cut a strip of 20 thou card 6mm wide and as long as the card (the strip must be at least 50mm long). Lay three strips of 30x30 thou along the strip, one to each side and one down the centre. Let this set then cut the strip into 6mm lengths. Cut some lengths of 20x20 thou, 8-10mm long then add one of these across the ends of the triple longitudinal 30x30 thou strips on each of the squares. Then add one to the centre of each square, then add two more to make a total of five transverse strips. By working in this way each addition has time to set before you add the next. When set trim the ends with scissors and add three more longitudinal 30x30 thou strips to each square, trim the ends with scissors or a modelling knife and then add the five strips of 20x20 thou as above. You need a minimum of about three layers of the 30x30 thou longitudinal strips to give sufficient height to the stack, the final layer is five lengths of 10x20 thou forming the top of the uppermost pallet. If you have any of the original strip of 20 thou left this can be cut into 6mm lengths and added to the base of the stack (these should be laid with the three strips running to the visible sides). Glue eight stacks to a wagon insert, trimmed to fit and perhaps 1mm narrower than the wagon body. To finish wind two lengths of black thread over each pair of stacks (I wound a single strand repeatedly round the load and insert) and glue the ends underneth the insert. I could not find any of my original loads so I made one up for the photo shown below, making this load took about two hours, the stacks should really be higher, the overall height would be similar to a van roof as the pallets weigh very little.

Fig___ Wagon with load of empty pallets
Photo showing a model Wagon with home-made load of empty pallets

It is good practice to secure a load so the centre of gravity is close to the centre of the wagon however if the load was large but substantially less than half the rated capacity of the wagon it could be secured toward one end. This was not common practice but it was seen occasionally.

Fig___ Wagon loaded with a large but light crate

Wagon loaded with a large but light crate secured toward one end of the wagon


Commercial Wagon Loads

There are various commercially available items which will serve as wagon loads, probably the best known are the Peco series, produced specifically as loads for the Peco wagons. This range includes mineral types such as `sand' and `iron ore' with a rather flat load of coal but also loads depicting blue red or terra-cotta bricks, planks, wooden cases and one of barrels. Peco loads fit into the wagon, using moulded ridges on the wagon sides to support them and are designed so that one and a half loads fit into the standard 15 foot wheel base chassis body. This also means that two loads can be combined to give a mix in one smaller wagon, such as half cases and half barrels.

Fig___ Peco mixed crate and barrel load

Photo of mixed Peco crate and barrel load

I prefer to remove the moulded supports from the wagon sides and fit a small block of wood under the centre of the load as this makes it easier to remove the loads and enables me to use them in other makes of wagon. The Peco loads are handy and quick, but they are all rather similar in appearance. For the mineral loads it is worth adding a little extra to each load, and the more granular iron ore load painted black looks good as house coal.

The barrel load has a flat base which is rather visible in the wagon. You can paint in the flat bits with black paint, or you can (with patience) cut away the plastic. Cutting out the barrel load is a bit fiddly, and requires some cleaning up afterwards with either a rat tailed (`Swiss') file or a strip of rolled up sand paper. I was surprised how visible this was and now make a point of it but it does mean you have to add the bottom part of the barrels (at least the centre ones) to provide support. A blob of Milliput works well for this, it can be smoothed to shape (when still wet) using a cocktail stick or toothpick dipped in water.

Fig___ Peco barrel loads

Photo of Peco barrel loads

The Peco barrels are shown loaded 'on end' and beer was certainly carried like this in the 1950s (this may have been in steel barrels however), the strongest part of a wooden barrel or cask is the section about one quarter of the way in from the ends. Loaded barrels are often shipped lying on two timber balks, this was standard procedure on ships where barrels are always stowed 'bilge on cantline', the bottom row is laid on parallel timbers, the next level is off-set so the bulge at the bottom (the bilge) sits in the dip at the ends of the row below (the cantline). This arrangement was also used on railway wagon loads for larger barrels. The alternative is called bilge and bilge, where the barrels are in line but offset along the line with the bulge in the upper row sitting between the barrels on the row below. This latter arrangement was certainly used with china clay barrels. The side bung should be at the top and the bung in the lid at the bottom, this means the end staves were vertical for strength and I have seen several photographs of railway wagons with barrels loaded on their sides in this way.

Fig ___ Barrels loaded on their sides (from photographs)

Sketches showing how barrels were loaded onto open wagons

When loaded (empty) into wagons the bottom lot were sometimes placed on their ends (as with the Peco load insert), with the top layer on their sides. Oil drums were sometimes loaded in this way, the bottom row vertical with drums laid on their side on top.

It is also worth using some well thinned black on the Peco wooden cases insert to emphasise the detail, and a little black can be wiped into the brick inserts to highlight the individual bricks. I took this to the point of actually painting the individual bricks with varying shades of red, but this is probably not worth the effort as distance eliminates such visible differences in the real world.

With the brick or plank loads you can add extra bits from small off-cuts of Slaters 10 thou Microstrip, glued on with a little polystyrene cement.

Loads of timber baulks or planks would be tied into the wagon but they were also often sheeted over, generally there seems to have been several ends protruding from the end of the wagon. A Smiths/Howes paper tarpaulin over a Peco set of planks, with a rope across the protruding end looks good.

Fig ___ Peco wagon loads

Photo of Peco wagon loads


Various suppliers offer items which may serve as loads for wagons, Pola offer a set of crates, barrels oil drums and sawn timber, Merit offer cable drums and the Spanish firm Ibertren has released cases, sacks and barrels. The German firms produce items to fit their wagons, some of which can be used on longer wheelbase British stock. One such range contains a ships engine crank, this comes on a set of supports but should be `crated' in Slaters microstrip for British use.

Fig ___ Crated engine crank Other firms have now entered the market, notably Ten Commandments who offer a range of loads in stone case plaster. Illustrated below are the barrel load (which can be used in a 7 plank wagon as supplied, for lower wagons you should add securing ropes across the top of the load) and a load of crates. The wagons are old Grafar 7 and 5 plank opens.

Fig ___ Ten Commandments wagon loads

Photo of ten commandments wagon loads

Another firm that released a set of cast plaster wagon loads was Shedloads models who released a series of loads including a rather good set of timber loads as well as crates, pipes, scrap metal and minerals, each offering three different loads. Unfortunately they do not seem to be currently on the market.

Fig ___ Shedload Models wagon loads

Photo of Shedload  Models wagon loads

Shedloads Models is also developing a magnetic tool for inserting and removing loads. I like removable loads although in practice I seldom bother removing them on the layout. The photo below shows the OO version (which I believe is still under development.

Fig ___ Shedload Models wagon load magnetic tool

Photo of Shedload  Models wagon load magnetic insertion/removal tool

The Ratio Oil Tanks can serve as a load, one could be chained down on ten foot wheelbase flat wagon. You could use either a P. D. Marsh one plank wagon or a Peco single bolster wagon (you would need to cut away the bolster pivot). These tanks are also the basis for a number of tank wagon conversions discussed under 'Kit Bashing'. For reference the Ratio oil tanks consist of four parts, two half's for the tank body with two domed ends, you get a total of two tanks in the kit. The barrel is 25mm long and each end adds another 1.5mm, the tank is 12mm in diameter. An alternative is to use odds and ends from your 'bits box'. Following a head cold I found myself the owner of some empty 'inhalers' (one Vicks the other Olbas Oil) which have a cylindrical cap with a domed end. Two of these formed something like a load I had seen in a photograph (some kind of retort I think), painted 'iron grey' and chained down. The load was removable as it was mounted on a strip of 10 thou card, match sticks were used to represent the old sleepers used to chock the wagon in place and the securing chains of twisted fuse wire were glued down just inside the match sticks.

Some 'OO' accessories can be used for N Gauge loads for example 'OO' sacks can be trimmed and used to represent the large sacks used prior to the Second World War. The Roco Minitanks range of models includes 'ammunition boxes', these come with separate lids and you get 28 long boxes 13mm x 2mm x 3mm and 28 rectangular boxes 8mm x 3mm x 5mm. You can combine two Minitanks boxes or two lids (the lids need the edges filling after sticking together) to produce another four types of box.

Fig ___ Roco amunition boxes

Photo of Roco ammunition boxes showing variations possible for loads

One can of course make up ones own inserts for wagons, I generally use an insert base of either plasticard or postcard, depending on what is to hand. For the Peco 10 foot wheel base wagons a rectangle 34 mm by 14 mm is about right, for the Lima 7 plank its about 33.5 mm by 16 mm, for the Graham Farish opens its 35 mm by 14.5 mm and for Hornby Minitrix 8 plank 36 mm by 15 mm. The height of the supporting block depends on the wagon, the thickness of the rectangle used, and the load depicted. Personally I tend to prefer having the top of the rectangle supporting the load quite low in the wagon, so that when trimmed to be an easy fit the gaps at the edge of the load do not show. When you push down on one end of the load the other end should rise up above the end of the wagon to make removal easier. For the support I use scraps of balsa wood, from a 3 foot length bought years ago, cut into about 10mm lengths and mounted centrally, more recently I have used lengths of match stick glued into a block with PVA and rectangles cut from Plastruct square tubing. The insert can be used for any kind of 'mineral' load and also for other types of load, the load can be made up from any scraps and oddments that come to hand.

Fig ___ Home made inserts showing coal load

Photo of Home made inserts showing coal load

Peco also provide a useful set of coke extension rails which can be glued to one of their 7-plank wagons. Coke is light but bulky compared to coal and these additional planks or rails were added to the top of a standard coal wagon to increase it's capacity. As noted above these wagons were also used for loads of old motor car tyres taken from scrap yards and they were also occasionally for moving oil drums (empty one at least). Typical drums are about three feet high and just under two feet in diameter, so loaded with the bottom drums on their ends and the top layer on their sides the drums laid on their sides have their centreline roughly level with the top of a mineral wagon. If sufficient drums are loaded they do not need to be roped in position. Oil drums standing on end can be made from 3.5-4mm diameter plastic straws, cut 6mm lengths of these and fill one end of each with Milliput. Stand these with the milliput end down and add a strip of 20 thou card cut to the size of the wagon floor and coated with Milliput. This ensures that the top of the drums are level. Add additional drums on top, either home made or use the Ratio drums, this produces a removable wagon load.

Something which is now easy to make is the open framed crate, all you need do is cut slices from the end of Plastruct Fineline square section tube, add a floor of 10 or 20 thou strip inside the resulting frames and add strips of 10x20 thou strip to the sides. When adding the strips to the sides do one side at a time, then lay the crate on a cutting board and trim the ends, if you do all the sides at one go you will find it difficult to do the trimming. The photo shows two such crates being made, all that is required is a load glued inside and ends adding again from 10x20 thou strip. In photographs of town goods yards you often see crates like this that have been emptied, usually with straw in the bottom and hanging from the open end. I have no idea why they were emtied at the yard.

Fig ___ Making crates for a wagon load or yard scene

Making crates for a wagon load or yard scene

Electrical cables have been shipped on large cable drums since before the First World War, cable drums range in size from about twelve foot in diameter by seven foot wide (carried on low-centred railway wagons) down to a few inches in size packed in cardboard boxes. I have seen a photo showing two drums roughly six foot in diameter by three feet thick being loaded (one at a time) onto a railway wagon using a basic yard hand crane in 1919. For wagons on a standard Peco chassis with a Peco body the maximum diameter of drum that will fit inside the loading gauge is roughly 16mm diameter. A large drum with a diameter of about eight feet would (typically) weigh in at about four tons, so two on a small drop-centre wagon would be about right, allowing for the securing of the load.

The drums are not as heavy as you might imagine, mainly because centre of the drum is empty as the cables can only be bent to a moderate curve, if you look closely at pictures you will see a ring of metal plates indicating the position of the inner wooden core of the drum. Cable drums should always remain upright (standing on its rim as otherwise the cable can fall out of line and tangle) and the wooden strips or battens around the drum would only be removed when the drum was being used. Peco act as distributors for the Merit range of accessories, which includes a pair of cable drums, one of which is partly used. The Merit part-used drum might be seen by the trackside but would not form part of a cargo (other than possibly on a departmental wagon), it can be modified by adding strips of 10x20 thou round the outside to produce a 'full drum' of cable. The centre should really have more 'cable' added but on mine I forgot and found I would not have been able to see it anyway. Some drums had the planking round the rim but-jointed with no visible gaps, so you can heat and bend some 1mm scribed card to suit (although it is easier to form scribed post card for the job).

I have not been able to find many decent photographs of cable drums in transit on the railway, however if the same practice as road transport was used the drums would secured with heavy timber chocks and sturdy ropes secured to the ends of the wagon would be passed over the top of the drums. I have not seen a road vehicle loaded with drums where the centre hole of the drum was used for securing chains or the like, presumably to avoid damage to the plates on these holes which serve as bearings when the drum is mounted on a support to be unrolled.

To lift the larger types on or off the wagon using a crane a steel bar would normally be passed through the centre hole and ropes attached to the ends, if the drum is large a spreader-bar might be used on the crane hook to avoid the ropes biting into the sides. An alternative is simply to roll the drum off the wagon, I remember this being done from a low-loader trailer at a major building site when I was a youngster. The drums in that case were rolled off a low-floored road trailer toward a heavy timber baulk.

I grew up near a major housing development in the 1950's and 60's and although I saw an occasional single drum the norm seemed to be for pairs of drums to be supplied, I have no idea why that might be but it does suggest that a single wagon carrying two drums would be appropriate on a layout (unless close to the factory making the cables, where more would be seen). One small point is that the lettering on the drum sides would be unlikely to end up neatly arranged and two drums would be unlikely to end up with a similar orientation. I added strips of 10x20 thou card to the rims of two 'part used' Merit cable drums and attached these to a base with 'timber' chocks, this is shown in the lower right in the illustration below (the wagon is a Lima mineral body on a Peco chassis, the wagon was modified for general goods use during World War Two). The sketch in the upper right shows two drums sitting in diagonally opposite corners of a BR steel bodied open wagon, I would have thought they should be on the centreline but this was taken from a photograph.

Fig ___ Cable drums as a wagon load

Cable drums in a three plank wagon, BR steel goods wagon and photo of model

Just to check I asked on the newsgroup uk.railways regarding any special instructions for the carriage of cable drums, John Shelly was able to advise -
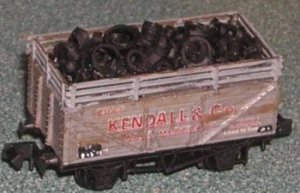
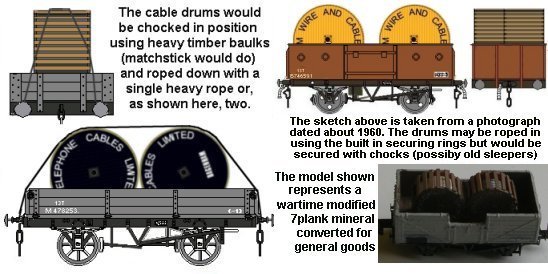
I have a copy of the BR 'Instructions for handling and loading specified Traffics' dated May 1957 that covers cable drums. There is no specific guidance on how to secure in a wagon (sections on some other goods do provide this) however the section on cranage states that the maximum size of steel spindle which can be accommodated in the spindle hole must be used. This will ensure the spindle is not over-stressed. It also states that the use of a beam or spreader is preferable to avoid undue pressure on the flange (the outer edge of the drum).


The wooden battens across the outside of the drums were usually in natural wood colour (cream when clean, darkening through light earth to dark earth as they got rolled about), as were the inside faces of the drums. On the drums I saw in the 50's the battens were typically between three and six inches wide by about an inch thick and were normally attached with gaps of perhaps two or three inches between them. Photographs taken pre world war two appear to show the battens much closer together with little or no gap between them (this may have been because of post war timber shortages).

The outer sides of the drums I remember climbing on as a child were usually painted a dark colour, usually black or very dark blue (since the 1990's I have seen a few with yellow outer sides). They usually had white lettering running round the edge and sometimes a company logo as well, again in white. The examples I remember seeing had very faded lettering and I cannot recall the names of the companies involved.

The Merit cable drums have raised lettering on the sides which can be picked out in white paint. You can make your own drums from lengths of tubing, scored to represent the battens with sides cut from 1mm scribed card but this means you have to letter the drum with pen and ink. If using paper discs to add the 'livery' you can cut a length of solid wooden rod of suitable diameter. Paint the outer surface dark grey and add the sides, trimming these to suit when dry. The battens round the outside can then be added from 1mm stirps of post card painted with Humbrol dark earth before gluing in position. Tedious but you only need two for a wagon load. The close-boarded pre-war drums are easier as you can use a long strip of postcard scribed to represent planking.

I have had some difficulty tracking down the details of the companies using these drums, the sketch shows liveries taken from photographs and a rather colourful example from the former Triang TT range. The Triang drums were interesting in that the livery was different on opposite sides of the drum, I have been told the yellow and black livery was accurate but I have not been able to confirm this. The Callendars cables drum is from a photograph dated 1935, Telephone Cables Limited was a long established company, the drawing is based on drums photographed in about 1950.

Fig ___ Cable drums showing liveries from photographs

Cable drums showing markings used

There have been a number of cable making companies in the UK however it is difficult to find illustrations showing the livery of their drums. If anyone can point me in the direction of photographs I would appreciate it.

The Aluminium Wire and Cable Co was set up in 1966, it was still trading under this name into the later 1970s but I am unsure as to its subsequent fate.

One of the two major companies was Associated Electrical Industries (originally formed from The Edison Swan Electric Company in 1929). In 1953 AEI acquired Siemens Bros. (already a major cable manufacturer), taking over the Liverpool Electric Cables Company in 1958 and W. T. Henleys (another long established cable making company) in 1959. Of these the W T Henley brand was retained, I believe the LEC brand was dropped and I believe the Siemens brand was henceforward associated with fibre optic cable systems. At some point (I think in the 1960s) AEI took over Telephone Cables Ltd and The London Electric Wire Co. In 1967 the General Electric Company took over AEI Cables and Hackbridge Cables Co., culminating in the formation of AEI Cables Ltd in 1968.

AEI logos

In March 1997 the GEC Wire and Cable Group, of which AEI Cables was part, was acquired by TT electronics plc (then called TT Group plc).

British Insulated Callendars Cables Ltd (BICC), was formed by a merger in 1945 of British Insulated Cables Ltd (started making cable in 1890) and Callendars Cable & Construction Ltd (who made cables from the later 1890s). BICC was for many years one of the biggest companies in the UK. In 1999 BICC Energy Cables was bought by General Cable Corporation (originally incorporated in New Jersey, USA, in 1927). The Company changed its name to BICC General and added Anaconda®, BICC® and Brand Rex Brands to it product line.

Both of AEI and BICC painted the sides of the drums a dark colour, it may have been blue or black but it usually faded quite quickly. I seem to remember the AEI logo on drums but I believe BICC just had their name in full round the edges of the drum.

Probably the most important undersea cable maker in the UK was Telcon, who traded under that name from the later 1850s until 1959). A less well known company but a major player in under sea cables was the Commercial Cable Company (based in Weston). CCC was bought by the American firm ITT in 1927, their first purchase in the UK. They sold it to Western Union in 1988. CCC eventually became in its final years a computer service and value added messaging outfit. They obtained the first value added licence in the UK, in part compensation for the loss of their cablegram licence as the then conservative government closed out all US cable subsidiaries to make way for the float of BT.


^
Go to top of page


International Good Guys ~ Making the world a better place since 1971 ~ Site maintained by Disabled Access to Computing
All material Copyright © Mike Smith 2003 unless otherwise credited