Available Models
Note - These notes were originally prepared in the mid 1980s, when there was little available to the British outline modeller. Since then the extensive (and rather good) Metcalf Models series of card buildings has appeared, Langley have introduced their vac-formed structures with white metal detailing parts, Kestrel Designs has introduced a number of useful plastic kits (notably their 'large factory building' with north light roof), Knightwing has introduced a number of ancillary structures and more recently has introduced a series of laser-cut wooden building kits. The continental ranges have also expanded, you can now buy everything from large concrete cooling towers to a complete steel works in kit form. This section will be updated at some point but it is low on my list of priorities.
Bilt-eezi is a range with a long pedigree, they provide a wide range of printed card buildings. The models are printed on rather light card, which benefits from reinforcing with some 'postcard' type card (or scraps of strip wood)when building. The only points I dislike with these kits are the printed-on windows (I much prefer glazed openings) and the lack of relief detail, recessed brickwork etcetera merely being printed on.
The kits are cheap enough that buying a second example and cutting out the raised detail for adding to the surface is a practical proposition, but this does take a fair bit of time and care.
Metcalf models are a more recent addition to the pre-printed card model scene. They were the first British firm to properly cater for 'industrial' buildings, offering a mill or factory complex and a brewery, both of a general 'Victorian' design, as well as modern industrial buildings (warehouse, loading bay and office) and an engine shed kit which offers real potential as an industrial building. The Metcalf building kits have now been produced in 'pre-cut' form with glazed windows, greatly improving their appearance (to my eye at least). The glazing was (and may still be) printed in white on clear plastic, for my 'mill' I scanned this with a backing of black card then changed the white to dark green and the black to 'clear' on the computer, producing a building with dark window frames.
Prototype models are again pre-printed card kits but they do come with glazed windows and additional parts to provide relief detail. Unfortunately Prototype only offer railway buildings and a row of terraced houses in their range. Having said which the terraced houses are excellent and items such as goods or engine sheds can be 'kit bashed' into various industrial buildings.
Card kits they are of course cheap and where the maker offers sheets of matching brick paper and the like this becomes a serious proposition.
One modeller went to the trouble of colour photocopying an OO scale card kit, reducing it by 50% in the process. The results were not at all bad and he was even able to copy the supplied glazing sheet onto clear acetate which is sometimes called OHP film (OHP = Over Head Projector). Modern colour photocopiers use a laser print system and the colour rendition is pretty good however there are a few practical difficulties. All photocopiers are somewhat 'iffy' on accuracy of scale, so when reducing get the whole job done at the same time so the machine is not adjusted in between. Even when printed on the heaviest grade paper the machine can handle (usually 100 gsm) the resulting model will need an internal card structure to give it strength, and you need to make this with some care. Finally this is a very expensive way to obtain a kit. Making a direct colour photocopy of an N gauge card kit is illegal and the high street shops will quite rightly refuse to do the work,.
Turning to plastic kits there are a number of house and shop kits but not a great deal in the way of industrial buildings as yet. The British firm Knightwing have released a useful 'factory' kit with a loading platform along one side. The building is XXXX in size and has a saw-tooth roof profile and a separate small boiler house with chimney. The boiler house and chimney is available separately.
Langley Miniature Models have a well known range of cast white metal scenic detail kits but they now offer low-relief kits in their 'Masterbuild' range. These comprise a light vacuum formed shell onto which a range of cast or etched details may be attached. This results in some very nice models and their new warehouse/factory looks to be something of a winner although it is not designed as a railway served building. With care these could form the basis of excellent full three dimensional models.
Langley offer the detailing kits separately, so you could for example buy a bag of windows to suit your home made building. The sack-doors for the upper floors and the associated cast metal hoists from the warehouse kit are available separately.
The Peco steam-era engine shed kit is interesting as it includes parts not required for the kit itself, including a spare set of large double doors with a curved profile and a pair of louvered roof ventilators. They also offer a larger two-track modern loco shed, which can serve virtually unaltered as a modern rolling stock works or as the basis for a range of modern industrial buildings.
As well as the 'industrial' fittings mentioned above the Ratio building kits are also useful for kit-bashing. They offer a small boiler house with chimney in their range as well as several standard railway structures. The boiler house, goods shed and engine shed kits use standard sides and the goods shed has one side with a large central door, the arched recesses for the windows can be opened up to provide an opening for a reasonably large set of double doors and the arched window opening can be cut down to give a doorway for people. Andy Calvert of the N Gauge Society used no less than eleven side wall units and a boiler house kit for a cider factory on his Nether Stowey layout. The result was a very pleasing industrial building of convincing proportions.
Kestrel Designs offer a packet of windows, drainpipes and doors, the same parts as used in their house and shop kits, which can be used for industrial buildings.
It is worth taking time at the library looking up examples of specific industries to get an idea of the general layout favoured for factories and the kind of 'clutter' that would be seen in the open.
Ratio have now released a set of 'industrial building' parts, including a square brick chimney and roof ventilators and they also sell a range of embossed cards, of particular interest being their curved corrugated iron roof (317) as supplied with their kits, this is a vacuum formed item, slate roofing (305), wood planking (304), flagstone pavement (308) and corrugated sheet (312, which is not a single large sheet but a bag of small squares). The flat corrugated sections are a bit thick and rather expensive, although fine for building structures they are less suitable for cladding a wooden or card building.
Plastruct Fineline polystyrene mouldings are to a scale of 1:200, which is close enough for our purposes. The range includes handrails (92 mm length HRS-2), stairs (75 mm length STAS-2) and rails to suit the stairs (92 mm length SRS-2). They have a range of useful shapes, of particular interest are the two finest I sections; BFS-2 (1.6 mm x 0.8 mm x 0.4 mm thick) and BFS-3 (2.4 mm x 1.2 mm x 0.5 mm thick) both supplied in 250 mm lengths serve well for longitudinal supporting girders. Vertical support can be provided using the finest of the H sections; HFS-2 (1.6 mm x 1.6 mm x 0.65 mm x 250 mm long) and HFS-3 (2.4 mm x 2.4 mm x 0.75 mm x 375 mm long). The T section TFS-1 at 1.2 mm x 1.2 mm x0.4 mm thick can be sanded down to make external bracing on the side panels of water tanks and the like. Square tube sections go up to 9.5 mm x 9.5 mm (STFS-12), this and the next size down 7.9 mm x 7.9 mm (STFS-10) can both be used for a variety of supporting pillars.
Rectangular tubes are available up to 9.5 mm x 6.4 mm (RTFS-12), which also serves for making mine 'tub' wagons. You get a 375 mm length, which would give you about 6 tubs.
Finally they now offer open web truss sections in eight sizes the smallest being 3.2 mm deep x 4.75 mm web. These sections have many uses including cranes, support for roof sections & etc.
Do look sideways at all available kits, for example the Ratio Platt Truss signal gantry could be used for a pipe-supporting gantry, part of an overhead conveyor system or even a light gantry crane. The Ratio OO scale LNER lattice signal kits provide a range of useful parts, not least jibs for cranes.
Industrial vehicles are available from various sources, the Scale Link cast metal range being probably the most highly regarded if rather expensive. Fleetline, Langley and P. D. Marsh all offer cast metal industrial vehicles. One of the more interesting models is the Knightwing cast metal fork lift truck kit, which can form the basis of a small mobile crane (although you do have to make the jib).
More recently Dornaplas (who make plastic building kits) have produced inexpensive and useful plastic kits of a pre-war Thornycroft lorry and a more modern Ford 'cargo' lorry. Both are available with a range of body types including tanker, cattle carrier, flatbed and tipper. They also offer a sprue of seven wheels, which can be handy (although these are not as detailed as the Roco Minitanks wheels, if you can find these).
The continental ranges tend to be quite expensive but there are some beautiful models to be had. The Preiser range includes some excellent horse drawn wagons including the extending type used for long logs and pipes (a good bet for a pre-war iron works). For post World War Two layouts the Eko range from Spain and the Wiking range both offer several useful vehicles.
Shire scenes offer a range of 'platform trolleys', the BR type (SN27) could serve for a variety of industrial uses. They also offer the ubiquitous 'skip' in packs of two (SN26).
Remember the fire buckets dotted around, if you have a paint or wood store for example there would almost certainly be a set of red fire buckets close by, in this case probably a double row of three hanging one above the other. The Scalelink range includes these vital little items
Continental Models for British Layouts
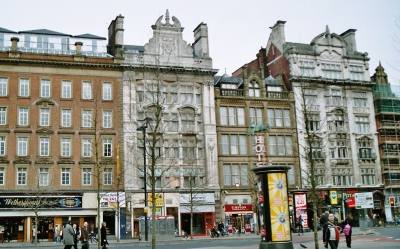
Continental kits are of variable quality, some are truly excellent whilst others are marred by over-heavy detail. All imported kits tend to be expensive, especially the models made in Germany, and they are of course based on continental prototypes, which often look 'foreign' due to the differences in building traditions. In the later nineteenth century there was a fondness for ornate architecture in Britain, particularly on office buildings, resulting in a rather 'German' look. However this was often confined only to the frontage of the building, the rear elevation being plain cheap brick.
Fig ___ Photographs of buildings in Manchester
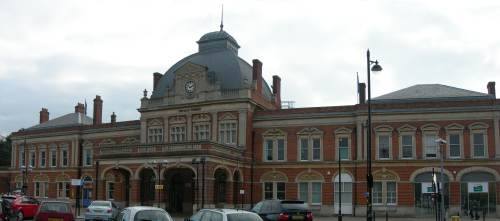
In some cases the function dictates the form, hence many pure industrial structures will be essentially the same wherever they are in the world, for example an oil tank is just an oil tank. Similarly many continental railway related buildings are very similar to those in Britain, the photo below shows the terminus building at Norwich, to my eye this bears a striking resemblance to a German station building from one of the main ranges of kits.
Fig___ Norwich station
The notes which follow only consider those models I feel have a potential British application.
The Pola range includes several buildings of interest, they offer a rather pleasing combined two-track engine shed with a workshop extension to one side forming an L shape. The buildings are of stone and go well with the Ratio station building and goods shed kits. The Ratio carriage shed would fit into the inside of the L if required and the combination would produce a compact 'works' for a small line.
As with the Ratio kits Pola have used the same moulding to produce a range of structures. Their two-track 'Nuremberg repairs hall' (264) is a two storey building with a saw-tooth roof featuring skylights and assorted ventilators. With a size of about ten inches by five inches it makes a good basis for a larger factory and goes well with that firms other factory buildings. It has two track entrances featuring 'roller' type doors. With a similar roof and sides but with new ends (both ends are the same however) they also offer a pair of single story workshops (262) and they have a boiler house and chimney kit (261). The latter has the same sides again but with ornate 'street frontage' ends and a conventional roof fitted with a louvered ventilator. Finally they offer a general purpose flat roofed, four story 'industrial' building (260), again using some of the same mouldings. This idea of re-using parts for a range of kits is good in that all the buildings go together quite well and presumably it helps to keep the costs down. It is however unfortunate in that not many factories were all built at the same time and two adjacent factories were usually quite different in appearance.
The Vollmer range includes a small factory with roof mounted tanks at one end (7900), suitable for any period after the 1950s. They also offer a glass walled suburban station (7520) and a 'modern branchline station' (7510) with a pleasantly ornate facade. Both of these could be used as industrial premises, the former for a post 1950s layout, the latter for any period from the 1930s on. One handy accessory is the cobbled street on a self-adhesive roll, 2m long by 4 cm wide (part No. 7354).
Kibri have some useful industrial kits in their range several of which are discussed elsewhere in regard to specific industries. The range includes a set of two oil storage tanks, with the difficult to model staircase up the sides (B-7462). The tanks require a space about nine inches long by three and a half inches wide, useful for an oil refinery or storage depot, and one occasionally sees similar tanks located close by a small harbour. These tanks make a good starting point for making gas holders for a small to medium size gas works (converting them to this use is discussed later under Gas Works and Coke Plants). The Kibri grain silo (B-7458) is a reasonably modern square building with a corrugated building beside it and a small lean-to structure beside that, personally I would use the latter elsewhere. There is a discharge pipe sticking from the side of the silo from which rail wagons can be loaded. Unfortunately they only offer the more modern type of silo in their HO range. The gravel works and loading bay (B-7482) is a nice model with an interesting set of roof profiles that would be difficult to model from scratch.
Heljan offer several kits of possible interest to the British modeller, some of which are mentioned elsewhere in the text. The modern grain silo (677) would serve for a variety of locations from the 1960s up to the present day and the diesel oil and sand depot kit (648) could be used in any industry using liquid chemicals. Their 'container crane' (665) is an old type gantry crane with a wooden 'house' covering the gantry itself, it is also a bit on the tall side but with a little surgery on the legs it could serve well at an engineering factory from 1900 to the present day. They offer a 'furniture factory' (672) which would serve in a British setting from about 1910 to the present day, although it has a rather 'American' look to it. The 'brewery' (678) and 'bottling plant' (679) are both very useful kits with a great deal of kit-bashing potential. The 'slaughter house with cattle pens' (681) is a concrete walled building with interesting tall narrow windows. It does not resemble any British slaughter house I know of but could be used as the basis of a number of factory types, one example might be a printing works. In the Heljan 4 mm scale accessories range is a pack of 12 modern lighting masts (T513), these have a useful tapering lattice construction and after a little sanding down could be used for various applications. One final thing to note in this range is the 4 mm scale coal mine (1708). The pit head gantry is actually a bit small and could serve for a 2mm model, you also get a usefully tall chimney but the buildings constituting the remainder of the kit would need to be sold.
Piko offer a very nice Victorian period factory (60010), sold as the Warwick factory, which has the look of a building to which additions have been made over the years. They also offer a companion model described as 'workshops' (60011) and a set of 'industrial tanks' (60014) but I was not able to find illustrations of these latter kits.
The Japanese firm Green Max offer a what is said to be a very nice factory building and three accessory packs to go with it. Sadly I forgot about this firm and neglected to obtain their latest catalogue so I am unable to comment further. The last importer I have listed for Green Max is LSWR Models, PO Box 79, Walton-on-Thames, Surrey, KT12 5RJ.
Building kits can of course be 'kit bashed' to produce alternative structures or combined with home made elements to represent specific industries. The American booklet `Modelling the Clinchfield in N', published by Kalamach Publications is available from several importers in the UK. This excellent little book covers the building of a large exhibition layout in about 1980 and contains details of several useful structures. They used the Heljan 'brewery' kit to build an electricity generating station but most of the remaining industrial buildings were made from wood, plastic card and assorted white metal and plastic fittings. The book also illustrates the various scratch built coal loading facilities and a silo building for dried China clay or Kaolin (the Europeanised spelling of the Chinese for High Mountain), which would also serve for a grain silo.
Rolling your own - Modelling Factories and other premises
In most cases a factory can be adequately represented by a nondescript 'industrial' brick building. My father was involved in converting a building called Orme Mill in Oldham near Manchester for use as an electronics factory. In spite of the name the building was very solidly constructed and they had to remove three foot of sand from the first floor, which had been used as a foundry of some kind.
There are several plastic kits available from continental firms and there are paper or card industrial buildings on the market. One thing to avoid is mixing paper buildings such as those in the Metcalf Models range with embossed plastic card structures such as Peco kits or continental models. It is okay to have both on the layout providing there is some distance between them but they each have a distinctive 'look' and when placed side by side neither looks right. I have found that printed brick paper combined with plastic or metal detail (guttering, windows etc.) works quite well.
The only real snag with the pre-printed card building kits is that on many commercial models the windows are printed on, which doesn't look nearly as good as glazed openings. Given patience you can add a tiny drop of varnish to each pane in the window, this takes a steady hand however. An alternative is to paint the whole window gloss dark grey and add new frame detail from strips cut from 'sticky labels' or strips of painted Selotape.
When making industrial buildings from scratch I find brick paper easier to work with then embossed plastic sheet for several reasons. Brick paper is paper pre-printed with bricks and the sheets include arched sections which can be cut out to go above doorways and windows. Archways and windows are always a problem with embossed sheet, where an arch is required I have to either kit-bash (expensive) or scribe plain plastic card by hand then cut this and fit it. Painting embossed brickwork I have found to be a difficult job, most books suggest painting it red then when the red has dried adding a thin wash of white, wiping this off to fill in the mortar courses. I got the best result by using a water based acrylic white paint over a base coat of enamel red.
Printed sheets of brick paper are available from various suppliers depicting plain red, engineering blue and sooty industrial bricks as well as stone and Welsh slate roofing. Brick paper can be glued paper card with diluted PVA woodworking glue, to stick the paper to plastic card place it in position and wash it over with Slaters Mek Pak liquid glue.
Rectangular windows are easy to add, cut the required holes in the building shell before adding the brick paper, when the brick paper is in place cut the paper over the opening diagonally in the form of an X and fold back the four sides, gluing them to the inside of the shell. This gives you a neat rebated window, with no need to colour the inner edges.
Adding relief detail such as 'string courses' in brickwork is easy with the printed sheets; cut a strip of a single line of bricks, colour the edges with felt-tipped pen and glue this in place. Buttresses are similarly easy to add, for plain vertical types I cut a strip of paper twice the required width, fold in the sides and glue the thing flat against the wall with PVA. As the paper is about an inch thick in N this gives a two inch deep rebate. To produce a recessed panel wall, similar to that on the Peco engine shed, make the main structure from stout card and cover with brick paper, then make an rectangular overlay from thinner card (postcard is about right) and cover this with brick paper. Cut the brick paper as for a window, trim to suit the frame and wrap the surplus paper round the edges. Glue this in place against the main wall and you have a rebate roughly four inches deep, this is slightly over scale but it looks good.
Fig ___ Using Brick Paper
One area where a degree of embossing is a real advantage is for random stone work. You can get random stone plastic card but another option is to use a suitably fine 'wood chip' embossed paper, this looks well when suitably painted. Irregular stone built buildings usually have corners of square-cut blocks and often have similar blocks to the sides of doors and windows. The only way I know to represent these is to laboriously cut up lengths of thin card in a 'battlement' shape and glue this over the corner (paper will not usually do as it moulds to the underlying relief detail).
Another important material in industrial building for which a degree of relief is required is of course corrugated iron (and also corrugated asbestos cement sheets). Corrugated iron was invented in 1825 by a London builder called Richard Walker, the corrugations make a thin sheet of metal much more rigid.
One of the earliest uses was for roofing buildings at the Royal Arsenal at Woolwich, the idea being that the relatively light sheets would cause less damage if the building blew up.
Walker hand-shaped the iron sheets but in 1844 a Birmingham firm patented shaped rollers which reduced the cost and the material soon gained wide acceptance for domestic roofing as well as industrials roofs and wall cladding. The addition of the galvanised zinc coating developed in 1880s made it rust proof and it soon became a common building material in both industrial and also, to a lesser extent, domestic structures.
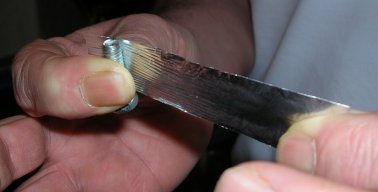
When I was a military modeller I produced a lot of 'corrugated iron' using bolts or threaded bar to emboss aluminium cooking foil. Ideally you need something like a mouse mat (or any fairly firm sheet of rubbery material, I used to use a scrap of rubber insertion jointing from the ships engine room), you lay the foil on this and tape the ends down and roll the threaded bar or bolt along whilst pressing down (a foot of 1"x1" timber is handy to press down with as you roll). For odd sheets you can produce lengths by holding a strip of foil firmly against the bolt with your thumb and pulling it through as shown below.
Fig___ Making corrugated iron sheet
Having built the main structure in card you can then clad it in the sheets using Evostick or Bostick adhesive, do not press down however as this will flatten the corrugations! Aluminium foil can be glued to paper with PVA wood glue but personally I prefer latex glue and this is the best option when sticking foil to plastic. When painting use well thinned paint, the end result is quite resistant to handling, at least for buildings, and I have formed the sheets round various curved formers and the corrugations remained clearly embossed. An alternative for flat sheets is to use sections of Ratio corrugated walling to crimp squares of chippy foil, I have not tried this myself however and I suspect the result would be well over scale.
Most corrugated iron was used in the form of plain flat sheets but by the turn of the century it was being used in curved sheets as seen on the Ratio corrugated iron roof (supplied with their carriage shed kit and also available separately). In the 1880s the new Royal Albert Docks opened in London, boasting single storey transit shed made up of two spans each sixty feet wide. The buildings were described as being 'almost entirely made of iron'.
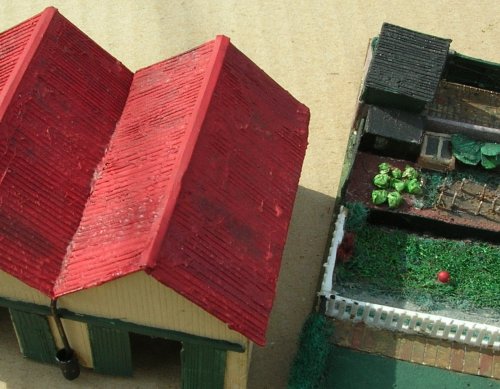
One option for occasional use is to wind thread over a card former, done with care this can produce excellent results. For modelling OO scale Nissen huts see Appendix X - Wargame Scenery - Simple Buildings. For N using mono-filament fishing line would be preferable to cotton thread as it is not 'hairy', however for one odd scrap of roofing I used cotton thread and the result is (to my eyes) acceptable. The examples shown (better photograph to be put up as time allows) are a double-span garage with a red painted roof and a small lean-to with a corrugated iron roof in a builders yard. Both were made with cotton thread and PVA and although somewhat over scale in N they served well enough toward the rear of the layout.
Fig ___ Wound-thread Corrugated Iron roofs
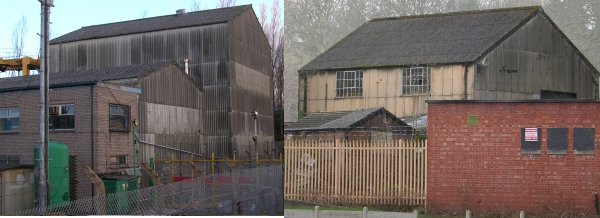
The photos below show a large building with corrugated metal walls and roof currently used as a stores and workshop for tall 'straddle carriers' at the container depot in Trafford Park and another large 'shed' type structure clad in corrugated metal but with a corrugated asbestos roof (Northwich, Cheshire).
Fig ___ Corrugated Iron Buildings
Home made buildings (and some card kits) are best constructed with an inner shell of thick paper card or 30 mm plastic card. Cut the windows and doors in the heavy shell before applying the brick paper, then cut the paper across each window opening in a X from corner to corner. The triangular pieces can then be folded back inside the shell, neatly disguising the edge as they go.
Doors are usually recessed into a wall and windows almost always are for building erected prior to the Second World War. In the 1940s metal window frames came into play, giving a flat flush-glazed look. Doors can be made or cut from a card model and glued to a card backing piece, which is in turn glued inside the rebate.
Recessed windows are similarly stuck to the rear face of the building shell. Making windows is one of the more tedious jobs. Ratio offer an etched brass fret of industrial windows (309) and a similar fret of domestic windows (310), these are rather 'flat' in appearance however. Personally I prefer the 3-D effect of cast metal or moulded plastic windows and I am particularly fond of those supplied with the Peco Engine shed kit. You get six large windows and two kinds of roof ventilators with this kit.
Glazed windows look better than painted on or printed windows, for one thing you get the effect of 'relief' by having them attached to the inner face of the wall. You can of course make your own, early modellers managed with microscope slides but clear plastic card is easier to work with.
For dirty windows, such as the roof lights in factories, a gentle rub over the inside face of the clear plastic sheet with fine sand paper turns them opaque and slightly grubby looking, a subsequent wash with dirty paint thinners leaves them filthy.
The sashing is where the work gets tedious, one thing not to try is painting the bars on with a brush, this almost always goes wrong as the line varies in thickness. A professional modeller, Mr. Alan Downes, made his windows by the traditional method of scribing the bars then filling in the lines with paint. This takes time and care and Mr. Downes went on to commercially produce a series of pre-printed plastic sheets under the trade name Downesglaze. S11 'signal box windows' is useful for crane cabs and the like, S13 'Engine Shed' windows is useful for large industrial buildings such as power stations and S14 and S16, railway station and domestic windows respectively, are suitable for a variety of industrial structures. The Downsglaze windows work well with paper or card structures and you can often find examples to suit the pre-printed windows on the card building kits mentioned above.
As an alternative to scribing and filling with paint you can add the sashing to the inside (where it will not be rubbed off) using a 'chinagraph' wax pencil from an artists supplies shop. Using the pencil rather than a paint brush it is much easier to get an even line width but both this method and the Downsglaze windows have a flaw in that when the light catches these windows at an angle the sash lines simply disappear.
Putting the sashes on the outside eliminates this problem, Pendon Museum use writing paper coloured with water colour paints and some modellers have done wonders with plastic strip. Personally I think one of the best options is fine cotton thread, this can be soaked in glue and laid onto the clear sheet (with care) and it seems to stick well enough. As most factories had a number of windows it is best to lay the glazing sheet over a sketch of the sashing to make them all even.
Lettraline is thin rub-down lining made by Lettraset, for window sashing it is quick and looks good. Lettraline is available in a range of widths but the smallest is 1/44th of an inch wide, which is near enough half a millimetre wide or three inches in British N and it is not cheap.
If you cannot afford to buy the ready made rub down stuff one option is to lay down lengths of Sellotape on a scrap of plastic card and paint these. When dry cut strips with a steel edge and a modelling scalpel and lay them up on the clear plastic sheet.
You could use pre-coloured tape such as electrical tape but this stuff is made out of rather elastic material and prone to peeling itself off.
Roof lights have to be made weather proof, usually these were set-in under the roof material at the top and lapped over the roof material at the bottom. This is easy enough to model; make up the window from a rectangle of clear plastic, add a frame round the edge and bars to suit. Cut a hole in the roof which is the same width as the window but about 2mm shorter. Place the window as shown in Fig ___ below, with about 0.5 mm overlap at the bottom and the extra 1.5 mm under the roof at the top. To secure the window you can use glue along the top overlap with a plastic roof, for a card roof add a strip of gummed paper to hold the top in place against the underside of the roof.
One modern type which is not easy to model is the corrugated plastic sheet, introduced in the 1960s and used where corrugated metal roofing in modern large span buildings. For opaque windows you can get away with painting the panel on in a light grey colour, this might look better if you used a rectangle of thin cigarette paper (Rizla blue) glued to the roof and painted that.
To get a clear panel you will need to make a two-part mould (you can use Ratio corrugated walling to make the mould with), then heat some clear plasticard in the oven until it is 'floppy', lay it on the base mould and press down with the top mould to form the shape. This is a handy technique for forming complicated shapes in plastic, aircraft modellers use it for cockpits and transport modellers use it to make curved mudguards and the like.
One of the problems with windows and doors is the arch or lintel at the top, however there are several options open to you for these. Printed brick papers usually come with a selection of 'arches' that can be cut to fit, when your factory has a lot of windows however this gets tedious. Another problem is that in many cases you will want an elliptical arch, which is relatively 'flat' in the centre and curves down toward the ends. This is not really practical using printed papers and the only option then is to scribe the brickwork in yourself. This can be done with paper card and plastic card buildings but it does take time, care and patience. One alternative is the 'flat arch' built up from one or two layers of brick, mounted on their ends and arranged with an angle as shown in the sketch below. Windows of up to about three feet width can be topped with a single stone lintel, and larger windows would have vertical stone supports at three foot intervals.
After the 1920s reinforced concrete became a viable option for lintels, the size of course depending on the span to be supported. If you look at the sketches of the concrete framed building you will note that the windows extend all the way up to the transverse members, windows in brick built structures could be supported by concrete beams up to four or five feet wide.
The I girder is a feature of many industrial doorways, this is easily represented sing a length of Plastruct Fineline I section strip. The size used depends on the amount of brickwork this is supporting, the wider the doorway and the taller the building above the deeper the I section would be, up to a maximum of about 2mm in N scale.
Windows and doors offer allow the modeller to add some character to a building, even on the relatively regimented mill type buildings there was often some variation. Not all openings were glazed, the sketch below shows a selection of windows and openings all taken from actual industrial buildings.
Fig ___ Windows & Doors
roof lights, arches, shuttered windows doors etc.
Other options will be found in the sketches of various buildings discussed in connection with specific industries.
The roof of a model is very important but all too often one is presented with a rather boring expanse of plain gable-ended pitched roof covered with a very uniforms 'slate paper'.
In the real world only new slate roofs were so regular and cutting your own slates makes a marked difference. Some people have gone to the trouble of cutting individual slates and laying these one by one this however takes a lot of time. Personally I feel the best compromise between realism and the constraints of a human lifetime is to make up paper strips. Heavy weight paper is all the rage these days but this results in slates a scale inch or so thick. You should ask for 60 gsm paper (that is paper which weighs sixty grams per square metre), this is sometimes called 'Bank Paper'. Paint your sheet with a flat mat paint, it does not matter if this is slightly patchy as long as it is not too light.
Draw in a grid of lines using a pencil and a ruler, I would suggest you space the lines at about 3mm intervals. Cut the paper into strips following one set of lines, this gives you one row of slates. Start at the bottom edge of the roof and lay the strips, each one overlapping the one below but leaving about 1 mm showing (try and make the amount of overlap constant).
Now mark up the sheet with pencil lines at 2 to 4 mm intervals, you do not have to be deadly accurate and the lines do not all have to be exactly the same spacing but try and get them fairly even. Using the finest tipped pen at your disposal with black ink in it add a second set of lines at right angles with a spacing of about 2 mm, giving you a grid of approximate squares. Now add touches of paint of a darker shade to individual squares on the grid at random. Cut along the pencil lines to produce rows of slates with black lines between. To make the whole thing more realistic you can then trim the bottom of some of the slates to make the lower edge less uniform. and trim a few to introduce a degree of unevenness in one edge. Lay the first strip along the bottom edge of the roof and work your way upwards overlapping each successive row to leave oblong shapes visible. Keep one strip to be cut into oblongs (about 3 mm by 2 mm) which can be added later to represent 'slipped slates'.
Lead roofing is easy, for flat sections simply glue down smooth paper with lengths of cotton to represent the joints, if using plastic card use 30 thou card for the roof with strips of 10x10 thou for the joints. The spaces between the joints need to be accurate but otherwise this is an easy option.
For roofing felt laid in strips use strips of paper, the earliest reference I have found to this material dates from the later 1930s when there was a factory making the stuff in London's docks. For buildings built before about 1945 paint a felt roof dark grey, for buildings after that date medium green would be more likely.
For felt or asbestos squares you could use continental decorative tile roofing intended for OO scale models but it is easier to use plastic card and scribe on a diamond pattern. Paint this medium green for felt, light grey for asbestos.
Ratio offer a corrugated iron roof but this appears to be an OO scale item as the corrugations are rather 'heavy' for N. An alternative method of making a curved corrugated iron roof is described under Nissen Huts above. Flat corrugated iron sheeting can be made using bacofoil and the tops from two medicine bottles as described above (see Fig ___).
A lot of factory buildings featured long pitched roofs with apparently little of interest in the way of detailing, if you look more closely however there were elements which serve to break up the sameness along the roof. One example is the walk-way often provided somewhere about the middle of the roof from which the sky-lights above and/or below could be cleaned using a long handled brush. The roof mounted sky-light was a feature of even minor industrial buildings from the early nineteenth century and adds some relief to an otherwise boring expanse.
The walk-ways are easy to model, a length of Plastruct Fineline handrail with a 3 mm wide strip of 1mm scribed plasticard to represent the walk-way itself.
Fig ___ Skylights and walk-ways
A flat roof is useful option especially when the building is not square in plan, however it is somewhat boring to look at. You can add various ventilators, access doors and the like to introduce a little variation. This is particularly useful where the building is positioned close to a 'scenic break', such as the entrance to a fiddle yard, as it distracts the eye of the viewer as the train trundles into oblivion.
Note concrete is porous and it was usual to add a waterproofing layer to the flat roof, often this was achieved simply with a coating of pitch, heated in a bucket until liquid and poured on.
Flat roofs are actually slightly inclined to drain rainwater, the slope is so gentle you cannot see it with the naked eye. Flat roofs usually have a low wall round them, called a parapet, this would form an open topped tank and collect rain water so openings are provided on the lower edge of the flat roof to allow the water to drain into down-pipes. If the down pipe became blocked a puddle or two against one wall might form. Where the waterproof coating on the roof meets the parapet it is usual to add a strip of lead 'flashing' along the joint to keep the wall itself dry.
As noted earlier there are a number of reasons for adding a chimney to the roof of a building, these can be effective especially if an unusual design such as the pyramid based type shown in the section on Industrial buildings and ancillary structures is used.
____________________________________________
^
Go to top of page