I needed some trees for a child's toy soldiers, from my childhood experience with toy soldiers I decided that you need at least half a dozen big trees and some small ones for a small woods. A dozen big trees and half a dozen smaller trees gives you enough for a few dotted about as well. As they were to be played with on the floor I wanted them to be safe to stand or fall onto, hence I could not use bamboo barbecue stick (for pines) or twisted wire (for other types), to see why Google Punj Stick.
To make them safe I used pipe cleaners for the trunk and main branches, a standard pipe cleaner makes a tree tall enough for Airfix 00 or 1/72nd type toy soldiers, although rather shorter than a real life tree would be. For use with 54mm soldiers or Britain's farm animals (also to 1:32nd I seem to remember) you can use the giant pipe cleaners sold in craft shops.
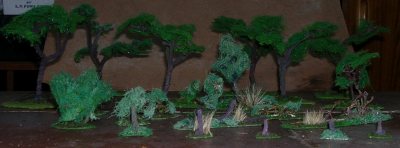
The photo below was not taken with any care (some one e-mailed me and asked what I was doing, this was the reply), the flash has washed out the colours of the foreground items but it shows the basic appearance of some of the trees and bushes made as described.
Take three or four pipe cleaners and twist them together, leaving about half an inch at the base. As with standard model railway twisted wire type trees the branches separate as they go up the tree and additional short lengths of pipe cleaner can be twisted on to make additional branchings. This leaves you with a rather sparse tree, but you can get paper-covered wire used by gardeners for tying up plants (or twisty-ties, but these need to be trimmed to a point toward their ends). Add lots of these twisted onto the main branches to produce the thinner branches of the tree. I added some florists rose wire as well, representing twigs, but I don't think that really helped with the coarse foliage I was using.
Now mix some 'bark coloured' paint, water colour or acrylic, with some PVA glue and coat the tree in this. As it dries it shrinks and pulls the thing together, hiding the twists in the pipe-cleaners quite effectively. Set aside to dry.
To make working on the thing easier I then glued the basic tree to its base before continuing. For the base I used hardboard, actually the back of an old MFI type wardrobe, easier to work with than hardboard this is more like artists mounting board and carves beautifully. I shaved this down toward the edges with a modelling knife and washed it with dilute green paint. Once dry I glued the tree on using Uhu. Quite a lot of glue was used and I sprinkled Dill Weed (from the spice rack) onto the glue around the base of the tree to represent 'leaf litter' under the tree itself.
Tease out some pan scourer, a nail or cocktail stick helps, remember you want it bushy rather the thin and flat. Scouring pads may appear 'green' but the colour it has much too much blue in it, nature is mainly yellow. The scouring pad material needs to be teased first as once painted it is impossible to tease it as it just tears.
In the past I have laid the scraps of teased scrub onto newspaper (several sheets thick)and used diluted acrylic paint and thinned oil paint to tint the scouring pads but that is messy and takes ages as it requires several applications of the paint. These days I use cheap motor car aerosol paint from the 'pound shop', British Racing Green for the under-side and lawn green for the top side.
After a couple of coats you should have a usably green material, cut or tear this in to sections (it probably broke apart as you were teasing it anyway) and glue these to the tree using a small amount of Uhu put onto the tops of the branches with a cocktail stick. Uhu is more tacky than PVA, so it holds the first lot of foliage better, but it strings badly and the strings dry visible, using the cocktail stick to apply the glue gets round this. Once you have some foliage on each part of the tree you can add more using PVA (which dries clear) as the material tangles with itself and holds the bits in place. You can then add more foliage below the branches as well until you have fleshed out the tree. If you wish you can then add some 'coarse turf' scatter, you can spray the tree with hair spray to make it sticky, add the flock, then spray with diluted PVA to seal the flock in place.
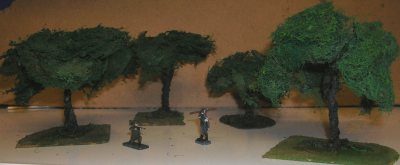
The photo below shows some examples of 'middle size' and 'small' trees made in the way described, with a couple of figures to give a sense of the scale.
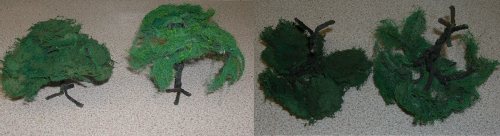
The photo below shows top and bottom views of a couple of examples that didn't get used, the photo serves to show the variation in colour possible by using acrylic and oil paints and how the bases are formed from the ends of the pipe cleaners.
The result is not a terribly good model, but it serves well enough and it is cheap. It is a bit obvious where someone is hiding if there is only one tree on a vast expanse of carpet, so I provide a selection of large trees, a few smaller trees and assorted bushes. Most of the work consisted of adding washes of paint, which I did when ever I went into the kitchen for a cup of tea. This went on for a few days as each dose had to dry, but using spray paint only takes an hour or so to do the job.
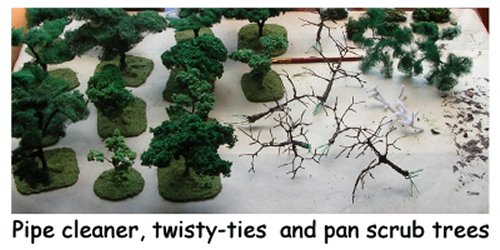
Slightly better photo of a set being made up using pipe cleaners, twisty ties and teased out pan scrub. For one lot I used teased out plant liner (coconut fibre) on the pipe cleaners and sprayed the lot black. I then sprayed with carpet glue (messy!) and threw on handfuls of home make foliage (car sponges run through the blender and mixed with green paint), some of the trees in the picture below are of this type but as this can shed the sets I make for younger kids just have painted pan scrub.
For hedges you can also use pan scourers, just cut strips of the stuff to about the required height of the hedge then tease it out and colour the material with a few coats of aerosol paint, British Racing green is good for hedges. You then colour the bottom bits with a 'bark' colour and you can add a top dressing of dyed sawdust or tea leaves to produce a thicker hedge if required (I didn't bother with my hedges as the dressing tends to come off and make a mess with handling). The resulting hedges are then glued to lengths of card which is in turn dressed with flock (I used dried tea leaves stuck down with Uhu glue and painted or some coloured sawdust). I got something over a couple of feet (60cm) of hedge from a single scouring pad, a single pack of four produced all I needed.
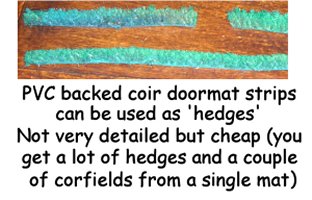
A quicker option that produces a lot of hedge is to buy a PVC backed plain natural coir (coconut fibre) doormat (they are available for less than £10) - Cut this into long narrow strips, spray the sides black then while that is still wet spray the tops and sides with green aerosol. That way you get a slightly lighter top but it may take a couple of coats of paint to get rid of all the pale colours. From a single mat you get several yards of hedge, I cut some down to allow gates and I had enough left over for a corn field. That idea came from Crusader Wargaming on YouTube.
For larger bushes I used pipe cleaners and/or wire twisty-ties painted brown and covered with the teased and painted scouring pad. The resulting bushes were glued down to scraps of card. For smaller bushes I used the stem from a bunch of grapes (having soaked this in dilute glycerine), painted brown and glued to scraps of card. These were again 'flocked' with scraps of the teased and painted scouring pads.
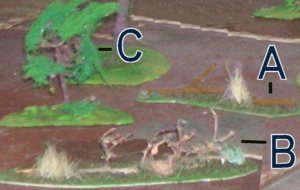
I included a 'dead tree' made of twisted pipe cleaner, with a couple of stubs from short lengths of pipe cleaner to represent a tree cut down some time earlier (A). I also used a grape stem, with some small scraps of teased and painted scouring pad, to represent a recently felled tree still with traces of its foliage still in place (B). The small tree on the left (C) has a bit of grape stem for its trunk and branches.
The card bases of both dead trees were dressed with teased scouring pad and long grass cut from a cheap decorating paste brush (which had pale bristles, ideal for the job). The photo doesn't show much detail and the harsh flash has shifted the colours a bit, I have tried to tidy it up a bit to make it more clear but I'm afraid its rather poor.
You can add some mushroom to the base of the trees by cutting the tops off dress making pins and painting them white. Use an un-cut pin to make holes and put the painted heads in. A small detail but it delighted the lad, being so small and with the heads uppermost they remain safe to stand on.