Rivers and canals make useful obstacles for toy soldiers to deal with. The standard method for making these is to use rectangles of base with the banks built-up and the water painted on and coated with gloss varnish. More recently people have been using two-part rsins to make the water but that stuff tends to leak out of any tiny crack and makes a real mess. On a model railway layout I tried adding short streaks of gloss varnish on a matt painted base to get the effect of ripples, this did work but it was a lot of effort to get it right and it was no better than a thin coat of gloss varnish.
For toy soldiers in 1:72nd scale or 20mm I plan to use an idea I got from Red Beard Baron on YouTube was to use strips of cloth, painted in darkening shades of blue (as for the pond described elsewhere) and with brown acrylic caulk or sealant for the banks and clear silicone sealant for the river itself. This produces a flexible river that is easy to roll up for storage.
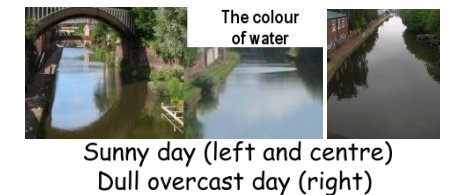
The colour of river and canal water is always a problem, water is only blue when seen at a shallow angle on a sunny day, when you get a strong reflection from the sky. At steeper angles water tends to be more grey, if the water is shallow you can see the bottom but only if you are looking directly down into the water. I usually opt for a greyish colour with just a hint of blue. Canals generally have fairly vertical sides, rivers tend to have more sloping banks with more 'sand' along the edge. The sand is visible close to the bank so add that to the colouring. Some people add actual sand to provide texture but thus far I haven't bothered with that. The photos below, taken at a shallow angle, show water on a summers day with a very blue sky (left and centre) and on a dull grey day (right).
I also managed a nice washed out rainbow coloured patch at a canal wharf, representing some spilled oil (in my case coal tar), using thinned matt paints over matt grey with the area then washed with thinned gloss varnish. The colours run concentrically round the edge of the patch of oil (they are produced by light reflecting off the surface of the oil and also off the surface of the water below, this 'interferes' to give the effect of a colour. The colours on a Butterfly 's wings are produced in a similar way). Note that the rainbow effect only applies to still water and again it took a lot of effort to get it right.
The fully modelled river or canal sections can look very good indeed but this approach it results in a lot of rather large pieces and on an uneven carpet the joins show clearly. For larger toy soldiers (1:32nd or 54mm scale) on a carpet a better option is just the model the banks of the river or canal, the resulting pairs of bank can be stored in a carrier bag and take up a lot less storage room. They are also less vulnerable to being knocked when playing, and easy to re-position when they are accidentally moved. It is best to number all the sections on the under-side so that pairs stay together, especially on the curves. One variation I have never actually used is to use pale grey cloth for the water, this keeps the bank sections attached to each other in pairs, but the whole lot folds away for storage.
The bank strips work best at about 10 inches long (25cm), any longer and they are liable to get moved, much less and it takes too long to set them up. For playing toy soldiers a total length of about three or four feet should suffice, giving a working radius of eighteen inches or so, any more than this and the child has to get up and walk along to the next bit. If using mounting card for the base of the banks it helps if you trim the outer edges down to a shallow slope.
For canals, which are generally straight, you can just cut two strips of mounting card, one about an inch wide the other about two inches wide. The mounting card is just about deep enough to represent the bank of a canal, usually only a few inches above the waterline. On the canal side edge of the wider strip you can add some thick card (file dividers for example) scribed to represent the flagstones on the towpath, or just dressed to represent the strip of muddy ground found there. The outer edges of the mounting card can be trimmed to a shallow slope, preferably with a slightly wavy outer edge and final dressing is just flock and occasional bushes.
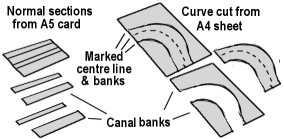
If you want a curve you cut a rectangle of card, draw the centre line of the canal onto it but then cut the full width of the canal, if you just cut down the centre the radius of the outer and inner curves don't work properly together. Trim the outer parts at the ends so the banks are about the same width as the straight pieces, this has no practical significance but looks a lot better.
Personally I would use strips cut from A5 card with a strip of mounting board to form the bank proper, this is quick and all the pieces will be the same length. This approach allows you to remove a section and replace it with a bridge mounted lengthways on an A4 card as discussed below.
Remember that in Europe they built much wider canals to accommodate the barges used on their larger rivers (they still use them commercially today), if you add a curve make it gentle as the barges are much larger than ours. There is a kit of a European barge available from Noch, this is very big and gives some idea of the space required. Generally rivers are an easier option for wargaming as these are much more variable in width.
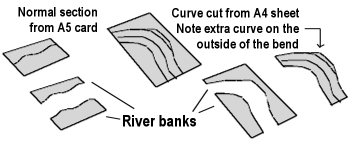
For a river things are slightly more complicated, for a start they are seldom straight, so you need to use a wider base strip and cut along a wavy line down the middle to introduce gentle curves. If the river ends up at an angle at the end of the piece cut this at right angles to the river so it will join up with the other pieces. Having a wider base also allows higher banks close to the water but still with a gentle slope on the outer side. Two inches seems to be wide enough for the bases, more if the bank is built up (such as on the outside of a bend whenever the river is cutting onto a bank of earth). For a river, which will have bits glued to the banks to stiffen it, you can use plain card. As with the canal lengths of about 10 inches (25cm) seem to work best for any scale, I opted for A4 file dividers cut in half making two A5 sheets, each of which was then cut lengthwise. This is cheaper than buying A5 sheets. This let me use A4 sheets laid across the 'river' under the bridges, knowing they would fit.
For sharper curves on a river you cut a rectangle and mark the centre line of the curve, then mark along the line of the banks (as with the canal if you just cut along the centre line the outer curve is too tight). Now add a second line on the outer part of the curve to widen the river in that direction (where the bank is being cut away by the flow of the river). Cut the resulting section from the rectangle and trim the ends do the banks are about the same width as the straighter sections.
For all sections build up the bank here and there with scraps of card to give a more uneven look, adding bushes and grass as dressing. On the inside bank of the curve the undergrowth should be set back with a little sand (or something that looks like sand) extending towards the 'river'.
Bridges
Bridges are necessary and form a focus for military activity, a couple of road bridges and perhaps a railway bridge, along with their 'destroyed' replacement is all that is required. The main problem is getting the bridge high enough above the water whilst keeping the approach ramps shallow. The base underneath the ends of the bridge should match the standard bank length. If you made long bank sections you can make some half length pieces and match the bridge to these. This means that the bridge can be inserted without having to move the entire river along to accommodate it. For a child playing (or an indecisive adult) the insertion of a bridge may occur well into the event. These two constraints make for a rather large item, but you only need a couple and the resulting model adds a lot of play value to a waterway.
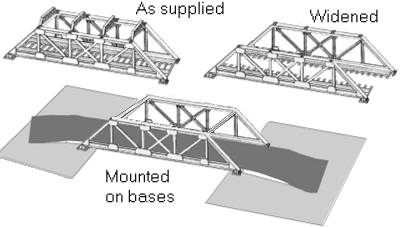
The Dapol/Airfix railway girder bridge serves well for a single track railway. It is a bit narrow for a road bridge but you can cut the base down the middle and glue on a wider road surface from 40 thou plastic card. This means you cannot use the supplied top girders (these can be used elsewhere), but simple lengths of Plastruct I or H section strip look okay. You can get away with just one of these at each end as this makes access easier, you can glue these between the top girders, but trim off the mounting on the top or they look unsightly. This bridge comes with 'feet' and needs end access ramps for a roadway, but a plastic card base can be glued to the bottom of the supplied feet and a ramp added laid on triangular fillets of card glued to the base. If you plan ahead (which I did not) you can make the new road surface (painted paper) extend beyond the ends of the bridge to get a nice run with no joins at the ends (a join or two on the bridge deck itself is less noticeable).
The sketch shows the bridge just sitting on its own supplied feet, leaving it very low above the water, this does however make the slope of the end ramps easier. The bridge is too long to have a single piece of plastic card used underneath it as a one-piece base. The approaches have to extend well beyond the ends of the bridge and you cannot get card sheets that big (at least not local to me). The rectangles under the ends are glued to the feet, the strength of this joint can be improved by extending the road approach ribs under the deck of the bridge and gluing them in place. If you opt for a stronger full-width base using (say) mounting card you should trim it back under the bridge to avoid a visible line across the 'water'.
An alternative I have never tried is the Peco model railway truss girder bridge sides, with these you make the decking yourself and you do not get the feet as on the Dapol model. This kit could be a handy starting point for a destroyed bridge.
Model railway plastic double-track tunnel mouths and road over-bridges can be used, you just cut away the lower part of the ends to reduce the height. The tunnel mouths do not have detailing on the reverse side however you can fill the inner sides of the parapets with scribed card. The surface of a short road bridge of this type would not be flat but would rise over the top in a gentle curve so make the road separately by gluing thick paper to a set of curved card ribs and glue this structure between the plastic sides. To get the curve of the ribs even you can trace along the edge of a large oval dinner plate. The bridge was often quite steep, producing the so called 'hump-backed' bridge, which is handy as it offers greater clearance over the water. As motor car speeds have increased councils are these days building up the roads to either side to reduce the number going airborne on the bridges.
You need a 'double track' bridge (or pair of tunnel mouths) for this, single track model railway bridges are too small for a meaningful river, anything that narrow is likely to be fordable and not much of an obstacle.
For the road surface itself you can use thick paper or thin card, this can be painted and then ironed flat if it warps. I used A4 card joined in the centre of the bridge. This gives a nice long run-in to the bridge which can be blended onto the base pieces on each side. Note that roads seldom cross rivers or canals at a right angle. More often the road would approach at an angle, but the bridge itself would be at right angles to the river (keeping it as short as possible). The road approaching the bridge would therefore turn to cross the bridge, then the road on the other side would curve away, often with quite a sharp corners involved. This Z bend can be cut into the paper roadway. As these bridges are shorter than the girder bridge you can model the banks projecting out under the bridge so the river to either side is slightly wider (and more of an obstacle).
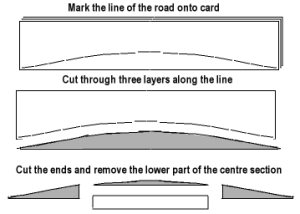
Models from firms selling train sets (such as Hornby and Bachman) tend to be expensive but Peco still offer a rather simple but very cheap pre-printed card double arch stone built railway bridge (less than a pound each). This simple card model was part of their original 1950s range but it is still available and serves well enough for wargame purposes. Again you will have to make the approach ramps for this (as described below). Triangles of corrugated cardboard serve, make these higher than required and curve the top to get a smooth transition onto the deck of the bridge.
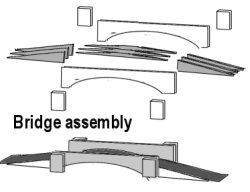
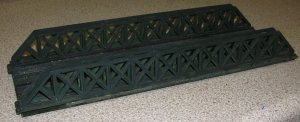
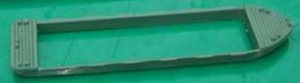
You can make your own 'stone bridges' with a little time and patience. The ribs to support the roadway are cut from three layers of corrugated cardboard using a hacksaw blade so they all match. Make the top a gentle curve to get a smooth transition onto the bridge. These ribs will be glued to the underside of the road surface with one to either side of the road decking and one in the centre. The deck or road itself is a strip of painted paper card, cornflake packet is fine for this. You may well find you need two pieces to get a sufficient length, if so make the join somewhere on the bridge itself as this is less visible. Again the roadway is not flat but rises up over the bridge, it is okay for the top of the sides to be horizontal however. It helps if you add curved strips of card as ribs under the roadway between the ends to give it the characteristic hump shape (also if you do not it can twist in storage). You can cut these as part of the ends then trim away the lower parts (I did try cutting the ribs as a single piece but the join between the ends and the centre section was so weak it came apart as I tried to assemble the bridge).
The sides are rectangles cut from more corrugated card with the arch cut into one side and covered with 'stone paper' (a stone pattern printed onto the inside face of A4 brown envelope paper). The characteristic curve of supporting stones under the arch can be cut from more of the same paper, glued on and marked with a fine tipped black pen (or you can just use the pen to mark them directly onto the basic covering paper). The deck has little or no support but the sides should extend onto the end pieces and be glued to them to keep things as they should be. You can of course add a full-width base but again trim this back under the bridge to avoid the visible black line across the 'water'.
With any toy soldier bridge it is worth considering making a 'blown up' version as well, this can then be inserted if the withdrawing forces have time to blow the bridge. If using the Airfix girder bridge you can make up some remains using plastic H section strip and strips of 30 thou card. The 'girders' can be dipped in boiling water and bent about a bit. This is however only slightly cheaper than buying a second bridge to destroy. One option I have not tried with the Airfix bridge is to make the base for one end but not glue the bridge to it. The two banks can then be pulled apart to allow one end to drop into the river, something you see quite often in wartime footage of destroyed bridges. The 'fixed' end would need to be hinged for that to work.
Military Bridges
Military bridges can be a lot closer to the water than the more permanent type and still look okay, which saves space on the approach. Those I made were intended to be laid across any two suitable bank sections and have no base of their own.
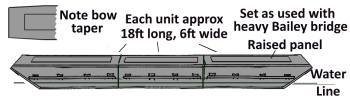
Airfix offer a Pontoon bridge kit that actually does look like the pontoon version of the Bailey bridge as used by the Allies in World War Two. If you assemble all of it the bridge it is rather long for practical toy soldier use and not as wide as it could be. It comprises two sections of bridge, each nearly 10 inches (about 24cm) long with two end ramps and a number of pontoons. This means that even using just a single section the river has to be at least 12 inches wide, which is fine for serious wargames but a bit on the wide side for toy soldiers on a carpet. You get five pontoons with this set, however they are not quite right for British use (see below) and for the full length this is only just enough support.
I made a 'quickie' heavy Bailey bridge (for his Churchill tanks) using the Airfix set by pairing up the bases and side girders. The side girders do resemble the standard Bailey bridge parts and to carry heavier loads on a Bailey bridge additional sets of trussing were added to the outside, hence my use of the Airfix girders in pairs. The resulting model is a bit narrow and the decking is not right (a Bailey bridge has plain transverse timbers), but it is only about 10 inches long and looks okay on a six inch (15cm) wide river.
A better Bailey bridge could be made up of two sheets of 30 thou card (the top scribed for transverse planking) with a frame of 30x30 thou strip spacers between them. For the sides you can use Plastruct open web truss girders with additional diagonals (the Bailey bridge trusses had X shaped trussing and did not have triangular sections on the ends).
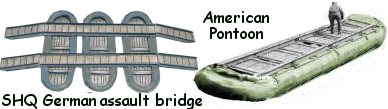
I used the Airfix pontoon bridge ends glued to some cut down German model railway 'modern lighting masts' to make an 'assault bridge', this is not in any sense accurate but it is a bit like the early assault bridges and doesn't look too bad. It is shorter than the other bridges supplied, hence some care is required in deploying the thing.
The pontoons supplied with the Airfix set are a bit high in the water but you can cut these down to half height with a razor saw (or even a hacksaw) and glue the top sections onto a card base to get a much more realistic look. One day I will make him a bridge to go on these (probably plastic card base with Plastruct open web trusses doctored to X frame trussing). The bottoms of the Airfix pontoons can be sanded in toward the base and with a little detailing at either end to make generic 'assault boats, not perfect but they look okay. The photo shows the top of a cut down Airfix pontoon with the base at each end sanded down a bit ready for gluing to a base (this one was being converted for use as a barge on an N Gauge model railway)
The real pontoons used were either flat ended 'punt' like boats made of wood or (especially for Americans) inflatable rubber boats with curved ends. I know the Germans also used the inflatable type pontoon for light bridges (their standard light bridge could support about 2.5 tons, the two treadways were laid across the boats separately with no visible connection between them). I am not sure if they also had rigid pontoons but they did have a bridge rather similar to the Bailey, although the sides were simple open trussing in a sawtooth pattern (as per the Plastruct open web girders).
The rigid punt type can be mass produced by printing the outline and plank lines onto thin dark coloured card, this is cut out and the corners scribed so it can be neatly folded and glued. The sketch shows the standard type used with the Bailey Bridge when this was employed as a pontoon type. The arrangement of pontoons varied depending on the traffic and span of the river, I would suggest making at least three for each Airfix bridge section, six for the full double length arranged in pairs with two under the join and two on each side in about the centre of the span.
As an aside the British used open topped folding assault boats with a wooden base and canvas sides, even using these as pontoons for small ferries in the Far East, but they also used rigid river assault boats that were of this 'punt' type (the front end was curved in slightly and cut-away on the under side and the top was open). I believe the standard river assault craft were about 20 feet long (80mm for Airfix figures) and about six or seven feet wide (25mm is about right) with ends curved in to about four feet wide (16mm). I am not sure on the details of these, I just happened to see one converted into a canal narrow boat when I was on a school trip in the early 1960s and someone told me it was a 'river landing craft' also known as an assault boat. These were used on rivers in all theaters for assault and patrolling and can be made from a simple box of file folder card as described, although adding a line of thread glued to the inside of the join helps reinforce the curved front ends.
The standard American 'treadway' bridge, for which the Airfix base is fine, did not have the side girders and ran across inflatable pontoons forming a continuous run of support. SHQ Miniatures offer a 1:76 (20mm scale) German assault bridge, which comprised separate runners laid across inflatable rafts and this can be converted to the American type by filling in the top of the rafts and adding a pair of longitudinal I section girders with the Airfix decking on top. This is not exactly accurate as the ends of the American pontoons were visibly angled upwards. The American pontoons were about three times as long as a Sherman tank is wide, I am not sure of the size of the SHQ pontoons but you may need to cut them in half and fix these to either side of the Airfix decking to get the right length. The gap would be hidden under the bridge decking.
To make your own inflatable type pontoon you need a base, cut to the oval shape of the boat, and something to make the inflated tube of the hull. For the bases make a template shape, this should be about one and a half inches wide and at least about an inch and a half longer than your bridge deck is wide, note the standard US type was as long as three Sherman tank widths. You can either use the template to trace round onto card or scan it and duplicate it to print multiple copies onto thin card and cut these out.
For the inflated tubular hull of the thing some people have had success rolling out 'filler' into a sausage, however when I tried this (actually to make sand bags) I was never able to get a consistent size and as I use Milliput it worked out expensive. If you can find some suitable diameter rubber or soft plastic hose or tubing you can glue this round the edge of the oval template, use a scrap of thick paper rolled into a tube and inserted into the ends of the hose to reinforce the join, which should be on one of the sides (hidden under the bridge decking). The tube needs to be at least 4mm in diameter, not more than about 7mm. Cover the tube with paper masking tape and coat this with PVA to give a 'rubberised canvass' texture. This also provides a reliable surface that can definitely be glued to the base (some plastic tubes do not take glue well). You may need to cut slits in the masking tape for the insides of the end curves or it will wrinkle but from memory I had no problems when I tried this some years ago.
Many years ago I made some inflatable boats to augment the single example you got with the Airfix US Marines, these had a plastic card base scribed for planking with lengths of electrical flex glued on with Araldite for the 'tube'. I found I could get a decent join by cutting the flex to length and pushing a beheaded dress making pin into the wire on one end then pushing this into the wire at the other end as I formed the boat to shape. Before gluing the tube to the base I covered the tube with masking tape which also served to hide the join on one side. The side ropes were thread, soaked in PVA glue and left to dry, these were then pre-formed into an undulating line and glued to the sides as the final assembly. This is not a particularly cheap option if you have to buy the wire, but if discarding something with a suitable flex cut this off and use it (mine was from a broken fan heater I believe). The resulting boats are quite heavy, for the small type you can pull the wire out but the length required for a bridge pontoon precludes this.
You can also use 'heat shrink' sleeve for the joint if using electrical cables. This is a soft and thin walled plastic tube that shrinks when heated, it is usually used to cover joints in electrical wiring. Cable with the wire still in it is stiff enough not to be crushed by the heat shrink, however to get an even appearance use a hair dryer rather than a cigarette lighter or candle to do the heating. If using this method I would still cover the resulting tube in paper masking tape and coat that with PVA before attaching to the base, this provides a good texture and also a better surface for the glue. One small point, if making boats with a more pointed front end (not that common in World War Two) the heat shrink connection should go at the prow (the pointed bit) as it will follow the abrupt curve neatly.
If you do not have suitable diameter tube or electrical flex I would suggest taking three or four lengths of string about 30 percent longer than the circumference of the base and making a 'rope'. Fold the lengths of string in half, hook them all together over a door handle or similar and then pass the leftmost length over the top repeatedly to wind them together into a 'rope'. If you do it this way they do not unravel, the extra 30 percent in length should be enough to allow for some gentle winding. When sufficiently wound run cheap paper gum over the lot and hang up to dry. The gum shrinks as it dries and pulls the run together. You will need a lot of fairly long lengths of this. Take the now dried string and wrap it in a length of newspaper (strips about two inches wide should go all the way round) or paper masking tape, as you do this rub it over with dilute PVA (you need to wet your fingers for this). Hang the resulting covered lengths up to dry (takes about a day), once dry paint this with something the colour you require (dark grey-green is I believe the right colour). Once the paint has dried then form the covered rope to follow the line of the card template bases, cutting and making the join somewhere along the straight side (a scrap of paper can be used to cover the join which can also be reinforced with a beheaded pin). Use Uhu to glue these down to the base as they are less likely to warp out of shape (you can put them under a scrap of planking with a weight on it to force them to dry flat).
The decking supplied with the Airfix pontoon bridge is fine, but you should leave off the side girders for an American bridge. If you know any railway modellers ask them about this as they often use the side girders and pontoons for model railways, leaving them with the decking spare. If the bridge deck will be glued in place you can just have the tubing of inflatable boats where it is visible at the ends, then use a Z shaped piece of card glued on edge to secure the underside of the bridge to the base of the boat. This requires a lot less tube. If the deck is not glued down however making the full boat allows them to be used as boats for assaults. The card punt type are easier to make as a complete boat and cost nothing in any case.
Timber bridges can be made using plastic strip and card, for an ad-hoc bridge put up by the military engineers use a mix of bamboo barbecue skewers and cocktail sticks with a couple of extra long matches thrown in. This gives you some variation in the size of the poles and tree trunks being used. To add a 'bark' effect scrape the sticks and skewers along a coarse threaded bolt. This type of bridge normally had flat planking laid along it for the wheels, lengths of card or sanded down coffee stirrers can be added for these. The 'ramps' at the ends can be made up of more logs piled into a slope, the end ramps on mine were attached with a scrap of cloth, so when placed on the river banks they will droop down onto the ground.
One point regarding military bridges is that when in use there would be quite a few people hanging about. The engineers who built the bridge had to maintain it, the pontoon type were frequently damaged by stuff floating down the river, or swept away by strong currents. MPs would also be on hand dealing with traffic control, there would typically be a big sign (perhaps three feet square) maked 'BRIDGE CONTROL' from where the operation of the bridge was directed. This allows the approaching vehicles to be held back and only brought forward to cross the bridge when ready, avoiding traffic jams and a nice big target at the bridge itself. The Airfix 'forward command post' kit comes with a radio on a table and a man to operate it which serves well for this group. You need at least a couple of MPs and half a dozen engineers to complete the scene, most of whom would not be carrying arms or in 'fighting' poses.