Gauze bandage makes a fair cammo net, get the widest you can find (nets were usually square). The best first move is to un-roll it, put it in a pan with some cheap tea bags and boil it for an hour or so, this gives a reasonable 'Hessian' base colour. Once you have finished remove the netting, replace the water and re-boil, then do this again. Finally let the water cool down and empty the tea leaves onto tin foil and leave for a day or so to dry on a window ledge, it's handy material for ground cover.
The stained netting can be used as is for the fine 'shrimp net' netting, often used simply draped over vehicles in World War Two just to break up the shape
The larger netting was supplied in large square sections, it was made of a cotton-like material and was usually a greenish brown in colour, khaki is a good bet but mine have ended up green. In the desert the squares on some nets (seen draped over anti-tank guns)looked to be quite small, perhaps three inches to a side and the nets themselves were 'sand' coloured. On the more common type the squares were about 6 inches to a side so 'dress netting' and plastic mesh 'fly screen' can be used for this although both are difficult to 'drape' convincingly. This type had strips of plain hessian about 4 inches wide(sometimes coloured either green or brown) woven through the netting. This was done in football stadiums (and elsewhere) as they could drape the netting down over the stands to work on it. The soldiers might also do work of this type, laying the net out flat on the ground. The strips were quite dense at the centre of the net, becoming gradually more sparse toward the edges. As the strips were woven into the net they were usually at right angles, following the line of the squares of the net itself.
There were various fairly standard patterns used for the strips, perhaps the most common was a square spiral (actually it was usually an oblong shape), with simple U shapes a close second. The problem is replicating this, although I did once make one using coloured cotton thread sewn into the pattern using a needle. This was then soaked in diluted PVA and then ironed between two sheets of tin foil to flatten it. It worked okay but it took ages and somehow although it was fairly accurate it didn't look the part.
Another approach used during the war was to tie short lengths of the Hessian in a bow, producing a sort of 'foliate' effect, this was less common in practice due to the time/work involved but is it easier to replicate as you can use flock of suitable colours dropped onto dots of undiluted PVA.
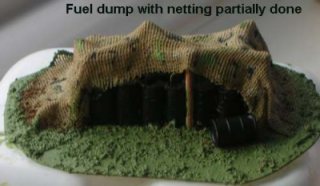
Personally I gave up on being prototypical and instead used a very fine paint brush to draw lines of greens, browns and (sparingly) black onto the bandage type netting. I did try coloured felt tip pens but the stripes were too wide and the wrong colours (although this was the best option for the black, using a fine pointed nylon nibbed pen). Once the paint is dry set up the subject, for stores dumps I add a few cocktail sticks glued to the dump, then brush the net with matt domestic wood varnish and drape it over the supports, moulding it to a 'draped' shape. The net stiffens as the varnish dries and holds its shape well. The end result is a recognisable cammo net, and looks the part although technically incorrect. For the more modern foliate cammo netting you could use dried (used) tea leaves dropped onto stripes of PVA then painted with acrylic paint.
Field guns were covered with a net supported on a ring of poles about 6 feet tall, with a cut in the net where the barrel was that could be 'tied' shut using lengths of 'coat hanger' wire. This is difficult to model and I only did it once. Vehicles often used poles to support the netting (so it was not just a 'tank shaped' blob of netting on the landscape) but personally I just stretch the netting out a bit as I use removable drapes for vehicles. For draped vehicles I use a card former (thin cornflake packet type material) with the netting glued to it, paint the card former a dark green first. For netting over a gun pit or similar I glue it to paper or thin card (formed to shape) and glue one edge to the scenery, this forms a simple hinge so the 'lid' of netting can be lifted clear for access.
In the field they often added some bits of bushes and the like on top of the netting, for which you can use flock stuck onto the stems from a bunch of grapes (soak the stem in dilute, 50-50 with water, glycerine first to stop it drying out and cracking).
Dress netting from your local dress making supply shop can be used for the bow-tie type of camouflage, you just add drops of undiluted PVA and suitable flock (dried used tea leaves of the use-with-strainer variety can be used for this, the stuff in tea bags seems to be mainly fine floor sweepings).
Anti-tank guns have to be within sight of the enemy and being set low down to the ground they kick up a lot of dust (especially in dry environments) so it was common to put some stakes into the ground in front of the gun and suspend a net (either a cammo net or just 'chicken wire') just above the ground to keep the dust from giving away the gun's position. Some fly-screen supported on scraps of match stick about 2-3mm tall serve for this.
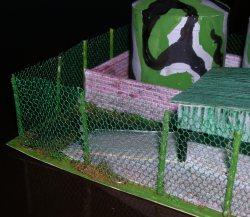
I wanted some chain-link fencing, for which 'dress netting' is acceptable (if you have a local Singer shop they will sell this stuff). The holes are realy a bit big for 1:76 models but it has the right degree of see-through openness to pass muster. It costs very little and all you need do is cut it to size and glue to posts (I used Uhu glue for this). l.
I purchased a couple of metres for use as chain link fencing on a model railway 'industrial' layout a while back and that is likely to take forever to use up. Pieces of this stuff can also be used as part of the paper strip surface on landscape pieces (see the section on trenches, bunkers and hills), producing a very robust surface.
The lad decided he wanted an air-base so I made a bulk fuel storage point, protected by chain link made using dress netting, the posts against the walls are cocktail sticks, those in the open are bent paper clips with a paper wrapper to get the thickness to match the cocktail stick type. Cocktail sticks or bamboo barbecue stick can be used as shown below, but not if a child is playing with the model on the floor - google Punji Stick to see why. If the fence is likely to be used on the floor I make the posts from a single piece of string with a cigarette paper cut in half lengthways and wrapped round it and soaked in watered down PVA glue. This makes a fairly stiff 'post' that can be trodden-on without causing injury. An alternative would be the soft iron 'florists wire' from the local florists. This stuff is soft enough to be safe, it is thick enough for use as fence posts for Airfix soldiers or OO/HO model railways (note do not get Rose Wire, that is very thin steel wire).
Chain link fencing has been around since the early 19th century but I used green for the air base which was a mistake, up to the 1950s it would have been pale grey galvanised wire, it comes in all sorts of colors so get the pale grey stuff if you can find it. Plastic coated chain-link (usually coloured dark green) was in widespread use by the 1960s, for a school add bits bulging out where the kids have been playing footbal