The Czech hedgehog was three pieces of steel bolted together to form a tank trap, these were first used by the Czech Army in the later 1930s and then used by all sides in World War Two and after. The Russians used a lot of them and they formed a large part of the German beach defence's on the French coast. The steel used had to be strong enough to take a load of about 60 tons, so it was generally quite thick. They used L and H shaped steel sections, either bolted or welded together (often two were welded with the third bolted on to make shipping them easier). The resulting item was about four feet high.
You can make quite realistic examples using 25mm lengths of Plastruct L section strip. The down side is the cost as the old ABS section is no longer available and you have to buy the more expensive polystyrene type these days.
To keep things square lay down a strip of Blue-Tak or Plastiscene and place 25mm lengths of L section into this as an inverted L, so the top is flat. Glue a second length centrally and at right angles to each piece to form a series of X shapes. Leave to set (an hour will do if using Mekpak or similar). Next place two thick books side by side and lay the X shapes onto these with one leg tucked between the books. The X should be at an angle to the books, which it will be if you push the books together to grip the L section. You now have a row of inverted T shapes on to which you can glue the third length of L section to make up the hedgehogs. If detail is important the real ones often had triangular gusset plates to reinforce the joints, which can be added from 20 thou card.
A very cheap alternative I remember from my childhood is to use the U shaped steel (?) ribs from a discarded umbrella cut to length with a junior hacksaw. You glue two of these at right angle to form an X shape, I used Araldite I think. Once this has set add the third leg, use a scrap of 5 Amp fuse wire of florists rose wire twisted round the joint to hold everything in place as the glue sets. The result looks okay but it would not be suitable for a child as they are as dangerous to feet as the real ones were to tanks.
I tried something similar using plastic drinking straws, you do not want the large diameter type you need the smaller diameter type which seems to be some kind of standard (sadly paper straws seem to have disappeared these days). Take a few and put them in a thick book, put more books on top and leave this to crush the straws flat. If they have a 'bendy' corrugated section cut that end off before starting. After a day or so cut the straws into 25mm lengths and using a ruler and craft knife cut each length in half down the middle, giving you two vaguely V shaped pieces. Cut carefully as you want the two sections to match. This plastic goes not glue at all well but you can make holes and use scraps of fuse wire to reinforce the joints. Gusset plates can be added using postcard glued on with Uhu if required.
The result is flimsy so tried mounting them on card bases, bedded into a mix of Uhu and pollyfilla (because that happened to be on the bench in front of me). These are very cheap but not very good representations of the original, and they are very fiddly to make and assemble. I felt they were not sturdy enough for a child to play with.
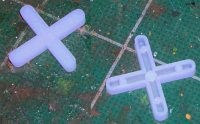
I think the best option for cheap and quick hedgehogs is to use plastic tile spacers, these are X shapes of plastic used to set tiles accurately on a wall. The larger type are about 1 inch by 1 inch and they have a hollow side which makes assembling the hedgehog possible. I picked up a pack of 100 large and 200 small spacers in a local Pound Shop. From the 100 larger type you get 66 hedgehogs, so including glue etc they work out at about 2p each.
First wash all the pieces in warm water with a drop of detergent (this removes the 'release agent' used in the moulding. Set aside to dry.
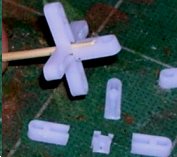
When dry divide them into groups of three, on two of these use the point of a modelling knife to bore down through the centre of the X on the plain side. Take a cocktail stick and push it through the hole then cut this down to about 5mm either side of the piece. Do this with both of the bored pieces. You can also cut off the ends of the X's, leaving a U shaped channel visible on the end. This looks slightly better but makes them less safe for a child's feet.
Now cut the four legs off the third piece close to the centre. These will have a channel section where they joined the centre of the piece, these channel sections will fit over the stubs of cocktail stick.
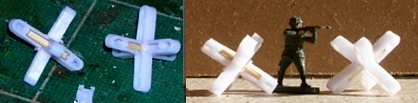
You need two stubs so one spacer provides the third leg for two hedgehogs. I glued the stubs in place with Uhu, I used the 'stringy' nature of this glue to wind glue round the base of the joint. The photos below show the completed item with a figure to show the scale, the example on the left has the ends cut off. the one on the right does not.
These do not need to be glued to a base, part of the idea behind the original design was that if blown about by an explosion they would still function. I gather they often had rectangular 'feet' added for use on soft ground, but this is optional. You may want to glue them in threes and fours to a card strip base to speed up the setting out of the battlefield but I have not done this.
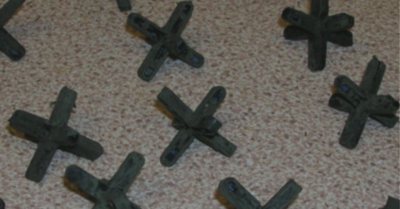
The result is not ideal, but they are cheap, quick to make and (I think) passable for the job in hand. The real hedgehogs were made from whatever was available, including railway line and even heavy timber, so these are not too out of spec. The plastic used does not glue terribly well but if the hedgehogs break they can be clipped back together and re-glued later. The photo below was taken when they were still being painted, as I came across old tins of paint that hadn't sealed properly I broke the crust and used up some of the paint. This produced a nice mix of black, grey and traces of rust.
The centre bits from the cut-down X's have a vaguely industrial air to them and served well painted dark grey with traces of rust as 'clutter' piled in one corner of a factory building.