Note - Military 'clutter', shell cases, ammunition boxes etc, is dealt with in the section on Trenches bunkers and hills
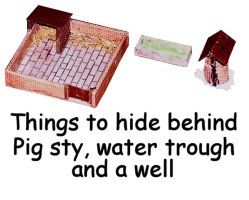
As noted in the section on buildings the world is a very cluttered place, as well as the big things like houses, fences, walls, trees and watercourses there is a great deal of smaller scale clutter in the real world that provides the troops things to hide behind.
Model railway ranges include a number of handy items to represent the kind of clutter I am talking about. These includes telegraph poles and street lamps (handy for marking the line of a road), ready-made post and rail fencing and odd piles of stuff used to represent loads and goods stacked in the railway goods yard. You can however produce a lot just using what you have on your desk (or in the bin beside it). As an example the 'small farm' set of buildings appeared very spartan and unrealistic until I added the outside loo, the water pump, a couple of horse troughs, a plough in the implement shed and a cart in the cart shed. These small details radically altered the appearance of the buildings. The cart was easy, as his (Revel) German field guns were emplaced I had a couple of limbers which provided the wheels and under-frame, all I added was a body from card with shafts from paper clips.
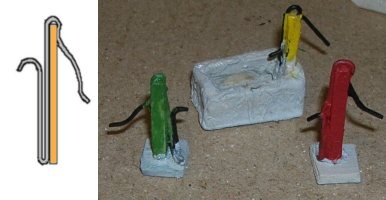
Water pumps are very easy to make, just a length of match stick and a bent paper clip will suffice,I needed quite a few so I mass produced them. Most seem to have been set on a stone base so I added a rectangle of 'lolly stick' to the free standing examples, to reinforce the joint at the base I bent out the bottom end of the folded paper clip, this is not prototypical but when painted it doesn't show too badly. Hopefully the sketch serves to show the method of assembly, please note that these models were rather hastily assembled and painted, not as neatly made as you would do for a model railway.
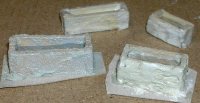
Water troughs for animals (mainly horses) to drink from were everywhere, up to the 1950s most of Europe was horse drawn, the supposedly highly mechanised German Army was mainly horse drawn. The typical horse trough would be about five feet long, two feet wide and two feet high. Most were hewn out of stone, others (dating from the Victorian era) were made of cast iron, the wooden type as seen in 'western' films seem to have been very uncommon in Europe. Those in the street or close by a country building would generally have a pump, those in isolated fields were often rigged up with a pipe from a stream or spring to provide a steady run of water, these usually had a cut down section at the far end for run-off, sometimes with a pit filled with stones underneath it to act as a soak away. The isolated field examples I remember as a child in the 1950s were light grey galvanised metal with rounded ends similar to those on the non-tap end of a bath. To go with the toy soldiers I made a few troughs, not terribly detailed, representing hewn stone types. I made some from lolly sticks, others were made from match sticks, three to a side with a couple set vertically between the ends and cut down when set (I made a couple only two matches high for use in the fields). Where the pump is built-in I used the match stick method, making the ends three wide so the pump could occupy the centre position at one end. All were either clad in scraps of a single ply of paper towel or coated in Pollyfilla (the paper method is best I think) to add some surface texture and hide the joints. When painting make the inside a slightly darker colour as the 'stone' is wet and add some tracesof green for the stuff you find growing in wet places. The examples shown are still drying, the bases will then be trimmed.
I tried adding PVA glue to represent the water, this did not work at all well, the glue shrinks a surprising amount as it dries and invariably ends up as a lumpy mess. It is easier to add some Pollyfilla to the inside and paint this then add a layer of gloss varnish (Uhu glue works as well). One approach that works well is to use match sticks to build up the sides, stoping one match short of the desired height. The vertical match sticks are then glued between the ends and the interior painted dark grey. A scrap of clear plastic packaging can then be trimmed to fit between the ends, this is glued to the top of the sides and the final match is then added to each side, it is best to pre-paint these light grey (or whatever colour you adopt for stone), then dress the outside and top match with paper to get the finished effect.
One small point; Having experimented I found the best tool for cutting match sticks is a pair of heavy scissors of the type used by ambulance drivers. These scissors work better than a scalpel, ordinary scissors are pretty useless, a Stanley knife works moderately well and a razor saw works very well.
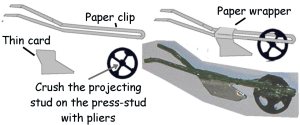
The plough is just a paper clip bent round a press stud for the front wheel, the plough share is a scrap of card cut to shape and glued between the wire, with a scrap of paper wrapped over the top and glued to the upper sides of the blade. Everything was glued with Uhu other than the paper for which I used PVA as this allows the paper to be formed tightly round the metal. The projecting stud on the press stud is crushed into a flat plate using pliers, this adds to the strength of the glued joint to the paperclip. I didn't bother adding more detail as I felt it unlikely to survive. In retrospect I should have used a scrap of florists rose wire to add a cross-bar between the handles near the top of the V shaped part.
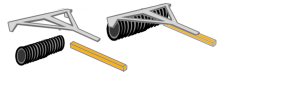
Another farm implement that is easy to make is a two-horse roller, just wind some thread round a length of something round (thin straw or thick skewer) about 4-6mm diameter and about 30mm long (you can cut a length from a threaded bolt for this bit) and add the top frame from card with a match for the central shaft.
In the country remember the outside loo was the norm until after the Second Word War, I mass-produced these from card as there were rather a lot of country buildings being made, I used pencils and marker pens to get various colours and even made a dilapidated example with no roof or door and interior detail for the abandoned cottage.
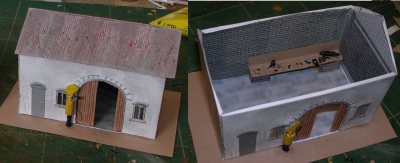
A modicum of internal detail is desirable, for the buildings with a removable roof you need to take a little care with the clutter as you have to leave room for the soldiers. The example shown below is a paper and card petrol station under construction, the 'garage' kit on which it is based was rather different in style and design. The 1930's petrol pump is a cocktail stick with a strip of paper wound round the mid part, a 'Shell' sign cut from yellow card packaging and a hose from wire (the other end of which passes through the wall and is glued inside to secure the pump in position). The printed hinged doors have been cut out and internal sliding doors fitted part-open. At the rear of the space is a simple card 'work bench' supported on 'drawers' and with some clutter on top, a large vice (scrap of carved match stick glued to the edge of the bench) and a couple of small metal drums on the floor below. This is enough detail to confirm the nature of the building but has no impact on the toy soldiers.
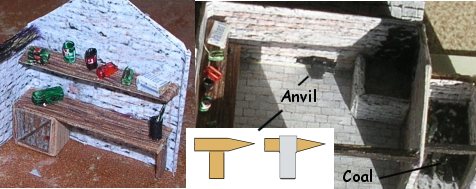
Drums and tins are just lengths of cocktail stick, bamboo skewer or coloured straws (the examples shown below were paper wrapped round cocktail sticks to make a long pipe, the off-cuts were then coloured and cut for workbench and kitchen clutter in several buildings). The 'grease pot' on the bench has a sliver of stained match stick in it as the 'stick' that invariably accompanies these.
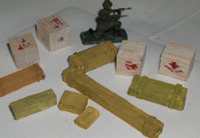
Small boxes and cartons can be represented with scraps of match stick tinted with felt tip or wrapped in printed paper, Bryant and May offer a box of extra long matches that are substantially thicker than standard matches,these can be used to make larger boxes (also good for ammunition boxes). The hip roofed tool box is two bits of these larger matches stuck together and then sanded to give the 'top'. The large carton on the shelf is a scrap of coloured magazine advert wrapped around a scrap of corrugated cardboard. I made up a selection of these small items whilst listening to a radio programme then used them as required for the models. The coal is bits of match stick and an old postcard coloured with black marker, the 'picture' side of the card retains a gloss finish and when cut up you get a fair representation of coal. The anvil is two bits of the large Bryant and May matches glued in a T, one being sharpened in a pencil sharpener for the pointed end, with a strip of paper card over the top.
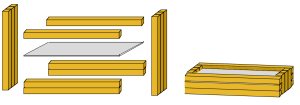
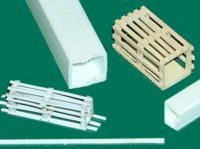
Crates and cases can be made up from card and strip wood. A crate is an open frame, usually stuffed with straw or similar and used to transport bulky items such as machinery. These can be made up using strips of card although buying a length of Plastruct rectangular tubing and cutting slices from this gives you nice consistently rectangular ends, the planks can be added using strips of plastic card. The examples shown were being made for an N Gauge model railway scene.
A case is a closed box and can be made using a lengths of strip wood, shops catering to model aircraft builders sell balsa in suitable rectangular lengths, you get about three feet for a lot less than a pound. You can mark plank lines on these with a black biro, stain and add exterior planking if required from strips of card but I needed quite a few and had a computer in front of me so I printed up a sheet of 'planking'. This was then tinted with a coloured pencil, cut and glued to lengths cut from the balsa strip, some with exterior planking cut from plain card. The advantage of this approach is that, with some forethought, you can add markings to appear on the case, otherwise you have to add these with felt-tip pen. The examples shown are rather crudely made, they are part of two lorry loads of 'Nazi loot', hence the eagle and swastika markings and serial numbers. The paper was run through a laser printer then coated with watercolour to get a 'wood' effect. Once dry the paper was cut and wrapped round scraps of strip wood and lolly sticks to make the cases. I didn't bother adding any external strips but many cases have the reinforcing on the inside in any case.
Similar cases but with more 'civilian' markings are handy in an industrial scene, they add clutter and provide cover for skirmishing troops. I didn't have much by way of strip wood to hand so I used match sticks glued together, two, four (two rows of two), six (two rows of three) or eight (two rows of four) matches produce different size boxes. These were then cut to length in an Xacto mitre box using a pencil mark on the inside of the box to get a consistent size. This is not ideal as the ends are difficult to get right and the glue sometimes failed, strip wood is better if you can find it. Large boxes sometimes had external wooden strapping, I represented this with strips of thin card. If using card strips you have to paint the things, if they are representing a 'plywood case' they can be left unpainted, lettering can be represented using dots made with a fine tipped fibre tip pen (in my case CD marking pens).
Industrial buildings really need clutter to bring them to life, you can either try and represent a specific industry, which can be interesting if time consuming, or you can just add a lot of vaguely industrial bits and pieces. Party poppers make good 'fermenting vats' and pipe work can be added using various types of wire or smaller diameter drinking straws,the modern plastic type have a handy corrugated bendy section.
A lot of machinery, such as presses, can be represented using blocks of wood, these can be positioned against the sides of a card building to reinforce the wall. I didn't have any wood to hand so I made up boxes of card. Adding some wire 'pipes' helps, operating levers can be staples or odd bits of wire, small press studs make good operating wheels on equipment and Gimp pins (which have a flat round head) work well as valve handles (you can mount these in a small bead and glue this between two lengths of 'pipe' to represent a valve).
Safety screens (much less common in the 1930s) can be added using either dress netting or the netting sold for tapestry making, both obtainable from you local Singer or dress making shop. The latter also works as gratings on air vents and the like with 25mm figures but it is a bit over scale for Airfix type figures (20mm), a better bet is to use the fine brass mesh disks sold in 'hippy shops' as 'screens' (this is the same material they used to use in motor car oil filters but that can be hard to find these days).
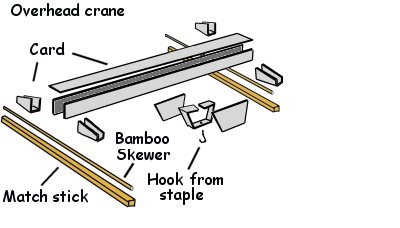
An overhead crane, parked out of the way at one end of its rails, gives a heavy industry feel to a scene, these work well inside a card building as the rails (bamboo skewers running above Bryant and May extra long match stick) serve to reinforce the sides to prevent warping. Remember industrial buildings often change hands and function, so you can have such a crane (with rusty patches to indicate lack of use) in any large industrial building.
If you make the Hedgehogs from tile spacers the centre bits from the cut-down X's have a vaguely industrial air to them, resembling iron castings, these served well painted dark grey with traces of rust piled in a corner as 'clutter'. The Ratio OO scale LNER lattice signals set provides some handy girder work for the factory at reasonable cost, as does the Airfix/Dapol 'signal gantry'.
Printed paper buildings generally lack any relief detail, however you can add drain pipes from Florists iron wire (handy to disguise a dodgy joint at the corner of a building or a visible overlap in a paper covering), window boxes (three match sticks glued to form an L shaped beam with the ends filled with some Milliput and flowers from flock), window sills and lintels from card and so on. By the time you nave finished they can look surprisingly 3-D.
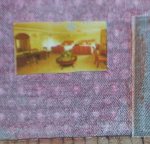
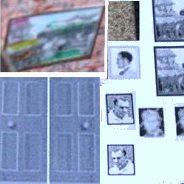
For ruined domestic buildings adding some odd details such as a picture hanging on a wall, wallpaper, sections of sagging flooring all add to the atmosphere and make the scene less sterile. I added these details to the non destroyed buildings as well, domestic clutter helps give a sense of place but confined to the outer walls does not interfere with the placement of toy soldiers. Colour photos from magazines can be used as 'paintings' although they tend to be a bit large, look for pictures of water colours as the photographs look much too well defined and harsh in a model. The example shown is a fragment cut from a larger image, up close it is the far end of a ball room but on the model it appears as a 'landscape' (I should have added a 'frame' with felt tip but forgot).
It is worth printing up a sheet of material, black and white photos of peoples heads and some couples, some 'paintings' etc to you can add them as you go. Remember that photos in World War Two would be black and white or brown tinted sepia and generally formal in appearance. If you add a coloured border you can colour the edges with a coloured felt tips (mine were done on a laser so they are all black for small photos and grey (later coloured brown) for 'paintings'). I also added a load of spare doors to the sheet for interior walls. If using a laser you can add colour using coloured pencils, as shown in the inset top left below, felt tips tend to be too strong for this.
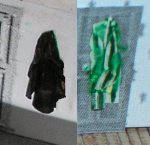
Pots and pans can be made using small diameter straw and a scrap of florists rose wire, fill the bottom with putty (which holds the wire in place), these can hang on the wall beside the stove. A pair of jack boots can be cut from a spare German or Russian figure and placed next to a door as 'wellies' (black) or 'riding boots' (reddish brown). I added a few coats and dressing gowns hanging behind or beside doors in some of the buildings, these were cut from cigarette paper (making the arms very wide and angled down at about 40 degrees). Tinted with felt tips or pencils then folded and glued in place with PVA.
On one war damaged building I added a bath tub, resting on the remains of a floor and hanging on by its plumbing (plastic bubble pack from a headache tablet for the bath and some florists rose wire for the pipes). For a damaged shop remember the remains of the plate glass window (scraps of clear plastic packaging glued down with Uhu). A shop window dummy can be made by cutting the head,legs and arms from a civilian figure, push a dress making pin into the base of the body and cut this to length, the 'stand' can be represented using a couple of scraps of 5 Amp fuse wire or florists rose wire wrapped round the pin to form an X shape and glued with Superglue.
For sections of collapsed walling and street barricades the best bet for bricks and cobble stones in cut-up matches, paint these burnt umber for bricks or light grey for stone with a wash of 'dirty thinners'. Heavy timber such as joists and the like can be represented with match stick and/or lengths of wooden lolly stick or coffee stirrer (add 'grain' to these with a fine tipped black biro and give them a going over with a brown pencil), planks and floor boards are just lengths of brown card (again these look better with some biro grain and a bit of colouring). The core of the pile can be some bits of corrugated cardboard, painted in a camouflage pattern of burnt umber, brown and black. There were usually various road vehicles incorporated in barricades, often horse drawn which can be folded up from card although the wheels are difficult to replicate and I have not yet found a really cheap source of wagon wheels (but firms such as P D Marsh sell them inexpensively in packets for railway modellers). A burned out tram is an easy conversion from a card model tram.
Burned out cars for barricades and crashed or abandoned civilian vehicles for wartime roads are a problem as there are not many cheap models available (on newsreels of the Second World War there was often a black private car in the ditch beside the road when fighting was in progress). I had a go at making one using Bacofoil pressed over a toy car which had a suitably '1930s' look about it. This was not a great success, I managed to get some parts to make the back end of a car for a pond but the result was distinctly flimsy. Given the low cost of the toy cars (at least compared to scale model cars) it is probably easier to hacksaw one about if all that is needed is a wreck. For World War Two look for American dragster types as these were often based on old car bodies, although you will need to de-dragster them (narrow the wheel arches and possibly the rear body).
Another use for the motor cars is to populate a garage, during wartime there are petrol shortages and a lot of private cars were put up on bricks with the wheels removed 'for the duration'. Adding one of these to a garage curbs the urge to put soldiers into every building just because there is an empty space there, having the wheels removed makes it easier to use one of the 'whizz wheels' type toy cars which have unrealistic wheels. You can cover the thing with a scrap of paper tinted light brown to represent a dust sheet or tarpaulin cover, which means you can be pretty rough with the modifications to the body. The bricks can be represented using a stack of lengths of match stick painted burnt umber.
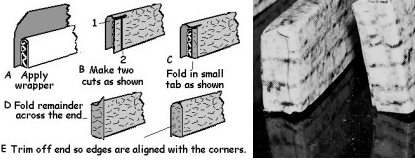
For stone walls I used strips of thick corrugated cardboard from a large box, again wrapped in printed paper, this is an easy option as you do not need the coping stones along the top. There is a slight problem however in that the ends of the wall are an open structure, difficult to glue the wrapper to. Also you do not want the wrapper over the end and onto the far side as the line will show. The best approach I have found so far is to make two cuts in the wrapper as shwn below (B). First cut along the top close by one side, then cut vertically to remove most of the side, leaving enough to reach about half way across the end when folded. Use PVA glue smeared on the smaller tab and fold this over the end, the PVA 'wets' the peper allowing you to pinch it to get a nice right angled fold (C). Then smear more PVA on the remainder of the end wrapper and fold this across the end, covering the already folded tab and again pinching to get a neat fold (D). When this has dried use scissors to trim up the side of the end and clip off the bit that folded up when you made the last fold (E).
For lengths of brick walling the best material I have found for free is thin (about 3mm) double-wall corrugated card, used for packaging moderately heavy items. Strips of this card wrapped in brick paper serve well, you do need to add a top of 'coping stones' to the wall to protect the brick work. If using a corrugated cardboard box bear in mind that some types can be very weak and liable to collapse (the lightweight corrugated card often used for supermarket boxes is a bit flimsy and flexible). To wrap the ends make two cuts, one to either side at the top. Now trim the sides, one needs to be slightly less than the width of the wall the other needs to be a bit longer. Smear PVA on the inside of the wrapper and fold the top centre strip down across the end, pinch the fold to make it nice and square. Now fold in the shorter side tab, again pinching it to get a good fold. Then fold over the longer side tab, again pinching to get a neat fold. When dry trim off the surplus from the large tab.
One option that works for a peaked type topping is to fold some thick paper or thin card then cut to either side of the fold to make a length of L shaped card about 4mm across (it is easier to do it this way than to try and fold a long thin strip accurately). Before adding this to the wall cut a very thin strip of card about 1mm wide and chop this into short lengths about 6mm long, bend these in half and glue them at intervals along the L section to represent the joints, trimming off the ends once the glue dries and before attaching to the wall. You can get away with only one every half inch (13mm) but in real life they would be more like a quarter inch (7mm) apart. You can get away with lengths of thick thread for the joints but the card looks better. Where I live this type all seem to be the same colour as 'engineering blue brick'. Alternatively for a flat stone coping cut a strip of card and mark this at 6mm intervals and paint.
If your houses are whitewashed walls and pantiles then the walls often have a pantile topping as well. For pantiles I just used a pattern printed onto paper and washed with diluted watercolour red, leave this to dry for a day or so before gluing to the card with Uhu. If slate roofs are common you can cut the card at an angle and add a strip of 'slate paper' along the sloped top side. One thing I tried but will probably not bother with again was adding scraps of cut up clear plastic from packaging in a bed of Pollyfilla mixed with PVA to represent the broken glass that featured on top of walls in the rougher parts of town into the 1970s. This took ages and a lot of patience as the scraps of 'glass' had a preference for sticking to fingers rather than wall.
The stone or brick pillars at the ends of a wall can be represented with match stick, I used the Bryant and May large matches for ordinary brick walls and four ordinary matches glued together and wrapped with printed paper for those on the thicker stone walls. Gates of all types were simply thick card, either covered with a printed overlay (which allows lettering on factory gates and the like) or just marked with a fine tip biro and tinted with felt tip pen or coloured pencil.