There are several websites detailing the making of wargame buildings, most of which seem better than my efforts. These notes are just some points I have not seen mentioned elsewhere. Buildings for wargames should have removable roofs so that figures can be placed inside, also the windows work better if the lower panes of glass are broken or the window is modeled open so they can be used as firing ports. Remember that for houses with shutters hinged windows open inwards. Multi-storey buildings are common, so it helps if you include a removable inner floor for the upper storey. This should ideally have a staircase for access.
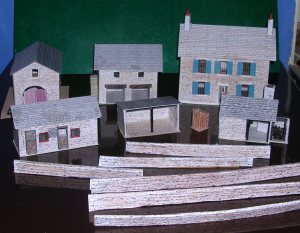
The world is a very cluttered place other than in very open country and it is surprising just how many buildings you may need. Having given the lad a few assorted types as part of the general scenery he showed an interest so I set about making up specific groups of buildings as sets: a farm, a small village and a small town (where he reaches the river and its bridges), leaving him to produce the simple military buildings for bases and airfields if he remains interested.
A 'small farm' needs at least five or six structures. I made a house, barn, implement shed with grain store above, cart shed, two-horse stables and tack room and a workshop with a small forge, an outside loo and some lengths of stone walling. I could have added a couple of 'sheds', chicken coops and a pig sty but I ran out of time. The photo shows this set nearing completion, the thing they are sitting on is about eighteen inches (24cm) square.
Do note these were made as toys for a youngster, so they lack the kind of exterior detailing I would apply to model railway structures, also they were all printed on a laser printer and coloured with coloured pencils and CD marker pens, so the colouring is a bit 'iffy'. As all the roofs are removable they are made slightly over size to make getting them back on easier for the youngster.
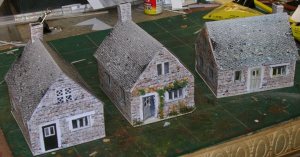
The village I made has a collection of cottages, a church, various out buildings (not forgetting the outside loos) with some odd lengths of walling. Lacking a post office or shop that is a very small village.
A very small town is a big thing even as a wargame model, you need at least a couple of blocks of three or four houses and shops plus a number of smaller buildings including houses, warehousing, sheds of various kinds and perhaps some small scale industry. The one advantage is that you can mass-produce some standard designs on a production line, and you can get away with less detail per building.
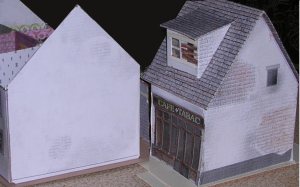
If the buildings are not open (ie you are not going to lift off the roof and put soldiers inside) you can make them quite narrow, down to about 3 inches (75mm) or slightly less, but a minimal house front has to be two inches (50mm) wide. For my town buildings I made the rooms two inches square, two rooms on each level, so the buildings are four inches (100mm) deep by multiples of two inches (50mm) long. The front and rear wall of multi-storey buildings are all two stories high, otherwise you cannot reach in to the ground floor, for a third floor I added a set of dormer windows in the roof. For sealed buildings I went for 3 inches depth to keep them visually consistent with the opening examples but taking up less space, the run down cafe shown below is slightly deeper than that.
For that first set I made each floor of a multi-story building just under one and a half inches deep (about 38mm), to ensure clearance for the soldiers but I think a depth of 1.25 inches (30-31mm) is better as it makes access to the lower floor easier.
You can also make replacement damaged buildings, although I just made some damaged structures (if he worries about this I'll tell him it was caused by stray bombs from a raid on the river bridges). Damaged buildings take more work as they display much more detail, but they make for more interesting warlike play.
A modicum of internal detail is desirable, even if it is a sealed building such as the cafe shown above. For the buildings with a removable roof you need to take a little care with the clutter as you have to leave room for the soldiers. This kind of clutter is discussed in a separate section.
It is best to glue any building, including the plastic kit types, down onto a card base, this seems to make the whole thing a lot more stable when you are lifting off the roof or removing the upper floor, also if the building is sitting on carpet it is easier to get the figures to remain upright. You can use 20 thou plastic card for the base, which is nice and thin, or you can use stiff paper card or artists mounting card, this latter is comparatively thick but can be trimmed at an angle with a sharp knife around the edges if you do not want a strip of 'pavement' around the building. 2 or 3mm MDF is cheap but you should wear a mask when cutting this stuff, extruded plastic sheeting can be used and a chap in America swears by vinyl floor tile material. For the country buildings and outer parts of industrial buildings I run Uhu glue along the outer join and sprinkle on some dyed sawdust or Dill Weed (from the kitchen herb rack) before the final trimming of the base. Uhu is less liable to cause warping and this dressing disguises and reinforces the join.
Windows
Glazing windows helps, for printed card building such as the lovely little Builteeze 'country garage' I fret out the windows, leaving the frames in place, back this with clear plastic glued on with PVA. That works but on buildings with lots of windows it gets tedious.
Most of the paper structures used to illustrate this section have the windows fretted out leaving the glazing bars in place. This is less than ideal, it takes ages and I never really get it all even, but it is free. When fretting out paper windows cut away from the glazing bars where possible, otherwise you will find that the blade has cut part through them due to the angle of the knife.
You can buy pre-printed windows on clear plastic sheets, usually these are plain white but on some the ink can be tinted with felt-tip pen (wipe over with a paper towel and the ink comes off the clear bits but 'stains' the printed parts. Sadly the old Downsglaze range is no longer advertised but Freestone Model Accessories has a range of plain white grids on clear plastic that serve well enough.
You can also buy packets of window frames in plastic, brass and white metal. For a number of buildings I have used plastic windows from the Dapol (former Airfix) plastic buildings but Gaugemaster sell the Dornaplas range of plastic windows and you get quite a few in the packet (they also do a pack of five sets of sliding doors and one of two sets of 'engine shed' doors (you can cut the curved part of the top of the engine shed doors away to get a square door). Model making firms such as Wills and Peco also sell packets of windows, downpipes, gutters etc but they are slightly more expensive than the old Dornaplas range.
The etched brass type are often cheaper than the other 3-D types but they need a little care in removing from the fret to keep them flat. There are various ranges, notably those from Brassmasters and Scalelink
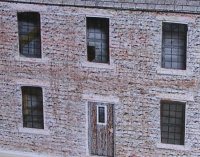
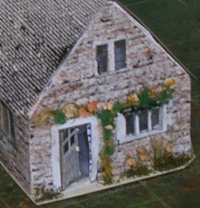
You can of course make your own windows, probably the easiest option is to use a computer printer to print the window frames onto OHP film (clear plastic sheets you can run through a computer printer for use on an overhead projector). The snag is you must use a very light colour to make them visible, and the lack of relief is noticeable. The farm house below has windows printed on OHP film using a mono laser printer, these look okay with the roof off but are almost invisible with the roof in place, especially in low light levels.
One application where laser printed OHP does work well is for 'leaded windows' of the type seen in older buildings and churches. The only real drawback is the cost of the OHP film, and do be sure to get laser film for a laser printer or ink jet film for an ink printer.
One of the standard model railway techniques is to scribe clear card then wash this with dilute white ink, which is retained in the cuts when you wipe it over with a cloth. Personally I never really got on with that method. I have had success using strips of paper glued to clear plastic with PVA (you can use strips cut from peel-off label sheets but this can be tricky to separate from the backing when cut into strips).
Occasionally you may find a plastic draining board cover in the form of a square grid, if so get one, they can be chopped up for windows. The plastic mesh sold as 'fly screen' has a 2mm mesh and serves well as the flat metal 'industrial' windows but you have to spray it with car paint as other paints don't seem to stick to it. Used at a 45 degree angle it works well for 'leaded windows' in churches and the like but it does need to be backed with clear plastic to keep it flat. Another useful material is the square welded 'rabbit hutch' netting (although the more common twisted wire type is not useable). You can also get this from some kinds of tubular suspended bird feeder. The 6mm square type serves for 'industrial' windows and it is also handy for the rafters of bombed roofs (with matchstick glued to the underside to represent the heavy timber rafters). Another alternative is 'cross stitch grating' which is a plastic grid that comes in various sizes, get the biggest 'holes' you can, I have some that is about 7 per inch and that works well as windows on smaller industrial or agricultural buildings. It is slightly less than 2mm thick so it sits back nicely in a 2mm card wall.
For the glass itself you can buy Slaters clear plastic but I mainly use clear plastic from packaging, the best to date being the thin material used by our local supermarket for selling fancy cakes (Apple Turnovers come in the biggest box). The plastic used for packets of cooked meat and cheese slices can be used but it tends to be 'murky' and prone to warping. Some of the more rigid bubble pack plastics can be handy, the razor blades I use come in such a pack and this has a neat right-angle where it fits into the cardboard holder. This right angle makes modeling open windows easy, add strips of paper for the frame around one leg of the L and glue the other leg to the inside on the building.
If using clear plastic from packaging for glazing kit windows check the glue will work by fixing a scrap to a bit of sprue or card. I have had success with both PVA and Uhu, both of which dry clear, with plastic cement however you tend to get fogging of the glass unless you are very careful (apply only to the frame, sparingly, and drop the glass in place without then moving it). Uhu will however fog some of the plastics used for food packaging (notably the very thin, stiff and clear plastic used for cakes in supermarkets).
One point I have noted is that PVA will warp even larger sheets of clear plastic, so do not glaze a full set of windows with one big piece of plastic, cut each window separately and the wall does not warp nearly as badly. Uhu does not seem to warp, so although it strings and gets everywhere I tend to use it for sticking paper buildings together as it sticks more quickly than PVA.
To suggest 'broken' windows when using a plastic kit building it is best to glue clear plastic to the inside of the plastic frame before assembling the building. Once this is dry you can use a pointed modeling knife blade to bore through individual panes of glass (this works well with the multi-pane windows on the Dapol/Airfix engine shed kit).
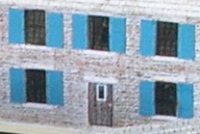
Shutters can be added to give a more 'Continental' look, the easy way is to pre-print these using a computer printer, I used a laser and cut-up file folder card for this, having added the first lot I found they were too flat and I needed to double the thickness to avoid a pre-printed tinplate look on printed paper buildings. A lot of shutters on French houses were very simple, just three planks of wood with additional strips across on the inside where the hinges go, and they are easy to make from card (scribe in the plank lines with a biro before cutting the card and add the horizontal planks from more card).
Paper and pre-printed card buildings
The cheapest option for buildings is to look for 'papercraft' buildings sometimes available for free on the internet and use thin card and coffee-stirers to reinforce these. Paper buildings generally lack any relief detail, however they are cheap and can be used as fillers to populate a scene quickly. The windows may be printed on the flat sides but some have windows set-back in recesses in the wall. In either case you can add windows as described above and I often just fret out the 'glass' panes and add a backing of clear plastic.
You will need something to ensure walls are square, the best option is to use lego bricks (Wilkinsons offers a cheap lego-like option that works well and costs less). I used to use a scrap of planed wood with some Bacofoil over it to check the inside corners were square. One chap uses scraps of planed timber clad in printed paper buildings, they are certainly robust but rather lacking in detail (and you cannot put troops inside them).
Free Paper Buildings
You can down-load and print several useful paper buildings offered for free on the Internet. I am reluctant to add links as these models seem to come and go rather often, I suggest you just do a search of 'free download paper buildings'. These are not usually as detailed as the commercial kits discussed below but some are rather good. Print them onto heavy mat photo paper (unless your printer has a straight through path for card, most do not). You may well need to experiment to scale the buildings, some are to model railway HO scale (1:87) or N Scale (1:160 for Continental and US, 1:148 for British N), whilst others are in no particular scale at all. I have used several paper buildings produced and offered as free downloads for the 'Gear kreig' game, they were to 15mm scale but scale up well for 20mm. Sadly the buildings do not seem to be available any longer, which is a pity as they were rather nice and I would have liked to recommend them.
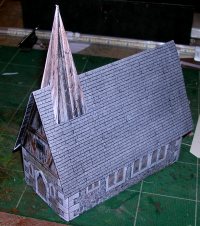
To re-scale the buildings I found the best option was to print a copy at its 'natural' size, compare this to a plastic figure, then re-size the image to get the desired scale. For PDF's I used the Prt Scn function to copy the screen, passing this in to Paint Shop Pro to do the work. The church shown below started as a downloaded file but as against I had tweaked and adjusted its size and proportion to fit with the other models I was making it bears little resemblance to the original. This is worth doing however as it allows you to establish a generic look with no jarring oddities in a scene. The original church was much taller and looked very different from the other, generally rather squat, village buildings I had made (it is also now easier to reach over when playing on the floor).
All the card buildings used for the illustrations in this section were all downloaded 'freebies'. I did not have a colour printer or the correct paper to hand, so I printed them on a laser and had a go with coloured pencils. The cottages I made for the village were mainly based on a rather nice crofters cottage produced by a German chap, to avoid repetition I edited the plans, changing windows, moving doors and the like, this produced three different cottages.
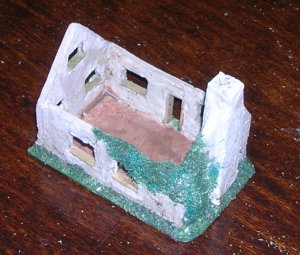
I printed off a fourth copy and made this into an abandoned ruin, to get the internal detail I mirror-imaged the plans, this meant I could just cut out the windows and glue the pieces of the second copy to the inside (you do have to trim them to fit, especially if you have reinforced the walls). I built the 'ruin' just using file-folder card with the printed paper stuck on both sides, this resulted in very thin walls, the sides were acceptable but the ends looked dreadful. I added 'ivy' over one end (teased out string 'flocked' with teased out scouring pad) and made an additional insert for the other end using lolly sticks as spacers to give it some depth. You can still see the join at the thick end but it will do for a child's toy soldiers.
The internal chimney breast in all the paper cottages was made using two lolly sticks stuck together, for the ruin I added some bits of match stick at the base and wrapped the lot in more of the patterned paper from the kit. For the inhabited cottages I added a stove or range to each one before gluing to the inside wall (normally the chimney is on the outside of the building but on the croft kit it ran up the inside of the wall and I couldn't be bothered creating a suitable external type myself).
You can of course make your own buildings, which is cheaper than buying kits, although windows can be a problem as you either have to make your own (as discussed above) or use the commercial alternatives. One option is to use a paper building as a template, build the structure from mounting card and cover this either with the printed paper walls or with your own (or with printed 'brick' or 'stone' paper). This approach can actually work rather well but care is required making the card shell. I have found the 'Prit stick' type glue to be the best for sticking the paper wrapper to the card shell.
For the inner structure artists 'mounting card' is easy to cut and can be shaped along the edges. Artists mounting board can often be obtained free if you ask politely at a picture framing shop where they will have lots of off-cuts but I generally use the cheaper 'greyboard' although that does warp when wet. Close grained heavy card of the type used in washing powder boxes is good to have, the thinner 'cornflake packet' type is less suitable for large surfaces such as the walls of buildings although the close grained card used in file folders is handy stuff to have as it seems less prone to warping than cornflake packet material. I did find that actual cornflake packet material was very soft and prone to warping, rather better was the card used for my packets of tea, fortunately I drink a lot of tea.
Plain white or grey card can be used for cement covered 'rendered' walls, or you can cover it with printed papers. If using 'foamcore' a thin covering of thinned down 'filler' stiffens the thing up and makes it less liable to break. The 'derelict cottage' shown below is made of 3mm foamcore coated in this way, the window ledges and door frame are coffee stirrers.
To save toner, and work, I made the original 'town' models in 'whitewashed brick' which can be produced on the laser easily, for areas where the whitewash had faded I went over the exposed bricks with a brown coloured pencil. For wooden plank walls I found some dark green divider cards and ran these through my laser printer to add the plank lines, handy for stores huts and the like. For stone I used a stone-wall computer tile image and printed this using a black and white printer onto plain paper (colouring this with coloured pencils) to match the farm buildings. For some of the stone walls used for fields I printed onto the inside face of a brown envelope (the outside is glossy and looks awful, the inside is matt and looks okay). An alternative for stone walling is wood-chip wallpaper, which painted up can make a good representation and has some relief detail. I just didn't have any to hand.
For the walls of a building you can use mounting board but the best material I have found for free is thin (about 3mm) double-wall corrugated card, used for packaging moderately heavy items. If using a corrugated cardboard box bear in mind that some can be very weak and liable to collapse (the lightweight corrugated card often used for supermarket boxes is a bit flimsy and flexible).
The only 'tip' I can offer for home made buildings is to mount the side walls against the inner face of the gable ends, otherwise your roof has to deal with sides that do not follow the line of the ends and you have to chamfer the top edges of the side walls (which is difficult to do neatly).
My own card buildings use a paper wrapper, either a printed 'building' or pre-printed brick paper. Rather than try and cut the brick paper to fit a completed building I just wrap it round the ends of the cut-out walls so I don't have to worry about the thing fitting when I assemble the building. You cannot do this with the wood chip wallpaper however.
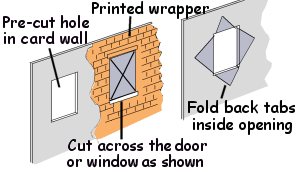
Cut the windows out of the card walls before applying the printed paper covering (for making widow and door openings a sharp chisel and a scrap of wood to cut on is quicker than using a modeling knife). If you can you should pre-colour the inside of the window area to match the desired frame colour. Lay the printed paper onto a lightly glued surface and when dry cut an X across each window opening with your knife, fold the resulting triangles back through the hole and glue. For a door just cut a T shape across the top and down the centre, the pieces then fold to either side of the door frame, you cannot see the underside of the lintel in normal use.
With paper buildings, when all I have is thin card for reinforcing, I often add some cut up lolly sticks or flat wooden 'coffee stirrers' to the inside walls (you can pick a few up at coffee shops and similar establishments but they are cheap enough to buy at a craft shop and I bought a large catering pack on line that will probably be all I ever need). These, being flat, seem to work better than extra long matches or cocktail sticks, although a match glued into each corner helps keep things square. If the building is to be open I may add an inner lining made by creating a mirror-image from the kit, altered in Paint Shop Pro to represent internal detail.
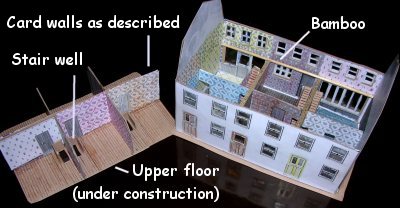
The example below shows a row of houses and shops being worked on, the ground floor is more or less complete. I did not have enough sturdy card for the shell of the building so I used 'file folder' card, clad in the printed sheets of paper outside and in. As the building was large I notched the top ends of the internal ground floor cross-walls and added a length of bamboo barbecue skewer along the wall, sitting in the notches. The walls are still a bit wobbly along the top but the building looks square. The exterior requires more detailing, for one thing chimneys will eventually be added to the ends, based on lolly sticks, to reinforce the end walls.
I was going to add another floor, with the rooms in the roof space and projecting dormer windows, but decided instead just to add an 'attic' floor (in which an intrepid Allied aviator can hide).
One odd point is that the upper floor needs to be handled, and I did not have any suitable thick card with which to make the walls. I used a strip of 'folder' card down the centre line with L shaped pieces glued to the ends and a U shaped piece in the centre. This means the centre wall is three sheets thick and the dividing walls are two sheets thick, which is strong enough to withstand handling.
Relief detail added to paper or card buildings will greatly improve their appearance and allow them to blend in more effectively with plastic structures. For example only metal framed windows are dead-flush with the outside wall. If the kit has printed-on windows and you are not going to glaze the windows yourself you can make a copy to get an extra set of windows. Then cut out the windows on the kit (if using a card liner use the modified kit to mark out the card walls and cut the windows out of these as well). Now you can assemble the kit and cut out the spare windows (with a bit of the surrounding walls) and glue these to the inside to give a little visible depth.
Window sills and the like can be added from peel-off labels and wire drain pipes can be added to the sides. For drain pipes plain iron florists wire is close enough, and easy to bend. You can also add some 'ivy' as described above, especially handy if you make a mess of a corner. To make one of the paper cottages shown above look different I changed the design of the front door (fixing it part open) and added roses and small flowers to the front wall. The roses are teased out string for the woody bits, teased scraps of pan scourer for the foliage and small scraps of cigarette paper tinted and screwed up for the 'roses' (smaller ones were used for some of the flowers along the front wall)
Commercial paper and card buildings
Model railway buildings are not intended for wargaming, but you can make the roof removable and add inner floors with a bit of care. A lot of these kits are low relief however, designed for the rear of a railway layout, make sure you are getting a full depth 3-D model. The commercial card buildings are better than my own home made types and they are not terribly expensive. The elderly Builteeze range of thin card buildings are amongst the cheapest and the at work on them is superb but they are very 'flat'. For N Gauge model railways I used a number of these kits, but I did add additional details by recessing the windows and adding some relief detail such as down-pipes. In 00 (20mm) scale the flatness is more apparent and making those changes is more important, and for toy soldiers you would want to fret out or replace the printed window panes. Builteeze kits I can recommend include the 'farm buildings' consisting of a stable a shed with a sliding door, a cart shed and a haystack. Only the first two are really suited and you need to attend to the w1ndows and doors but they make pleasing models. The cart shed is usable but the walls are a bit thin even though the card is double thickness so it isn't terribly strong. They also do a matching 'large barn' but that is large and requires a lot of work to make it toy soldier friendly. The Builteeze country garage (with 'detailed' interior is another I would recommend, it makes up into a useful building that might legitimately be seen out in the country.
Kits from the likes of Superquick and Metcalf are printed onto thick card and have some relief detail included in the kit. The windows are printed onto clear plastic and have no relief detail, this makes broken windows more difficult to achieve but the basic buildings can work well with a little extra work to add useable interiors.
Plastic Kit Buildings
Some military vehicle kits (notably the former Matchbox range, now marketed by Revel) come with scenic walling, usually destroyed buildings. Unfortunately these are intended for display and have an open rear face which you have to fill with plastic card to make them fully 3-D but in my experience this tends to look pretty rough when finished (that could be my lack of skill, care and patience). Slater's plastikard is a range of embossed plastic card, available in brick work, stone and the like, it can be very handy when modifying plastic building kits. It is a bit thin for a building you want to open so if making your own buildings it is best used as an outer dressing in place of brick or stone paper.
The plastic buildings for model railways can be used with toy soldiers, but the walls of these buildings are only about 40 thou thick, which is a bit flat (as long as they have a roof on this is not immediately apparent). As these buildings are intended for model railway use they are generally slightly under scale, so you have to accept a representational floor plan with few inner walls. As an example the Dapol/Airfix 'Country Inn' kit makes a good 'headquarters building'although each floor has only three rooms (one in the centre and one in either end wing). For a World War Two German headquarters there are a few details you can add to this building. The Matchbox/Revel German half track and anti-tank gun kit comes with some scenic 'North African' walling, including a rather neat German eagle to go over the door. I added a couple of the tall thin Nazi red flags printed on an ink-jet printer.
I have used a number of the old Dapol (formerly Airfix) buildings although they are generally very 'British' in appearance some are useable for elsewhere. The double-fronted 'village shop' works for anywhere in Europe and the 'thatched cottage' resembles some buildings in Northern France. The Dapol/Airfix 'village church' is very compact and serves well enough for anywhere in Europe (it makes a good Regimental Aid Post - the first place a wounded soldier is taken from the battlefield). These kits are very old now, the moulds are 50 years or more old and some turn out a bit warped however their age is reflected in the price and even if the building is not what you want they do come with separate windows and doors which can be very useful (not least as you can use the kit wall to mark out the opening). I have used a number of windows and doors from the thatched cottage and station building/booking hall in my own home made buildings
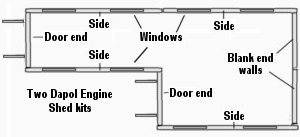
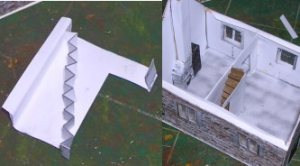
Two Dapol/Airfix 'engine shed' kits can make a decent sized factory by arranging the parts as shown below (this was described in an article in Airfix Magazine in the early 1970s for making a larger engine shed). You need to make a new roof from card but you can use the roof ventilators from the kit (or keep them for use with the kit roofs on home made buildings). You get a decent size industrial building, three times the floor area of a single shed, out of the two kits. You can add a large door to one of the sides by cutting a rectangle following the line of the supplied window and attaching a larger 'planked' piece of card to the inside, representing a sliding door.
You can make something similar with just one kit by using card for the long wall and having this out of sight at the rear, you can use the non-door end to mark up some card to make the double section for the end, using the kit door end on the shorter part of the building. On balance it is easier to use the two kits as this is so much less work, although getting the join between the two roof sections right was a tad tricky. I used the kit roofs for other buildings and used 2mm card covered in slate paper for the roof and added cross-beams from barbecue skewers so it can lift off as one piece. To reinforce the join I added a 'walkway' from scribed cornflake packet card and packed the space underneath with milliput.
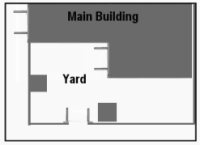
I glued the building down to a mounting card base, adding a wall of similar card wrapped in brick paper round the outside to form an enclosed compound with a 'pavement' along two sides. The doors on the end of the longer building open onto the roadway, I should have replaced these with a sliding door. The factory gates in the adjoining wall were from the Airfix Battle of Waterloo Farmhouse kit (but if you do use a sliding door on the main building you can use the unused shed doors instead). A lean-to shed from one of the engine shed kits was added to the inside of the outer wall, the other became the 'office' by the gates, both serve to brace those outer walls. The base was cut down at the gates to make the 'dropped curb' onto the roads. The 'factory' is handy as a REME base as well as something to fight over.
The Airfix Battle of Waterloo Farmhouse kit is very useful but surprisingly large (it will fit on an A3 sheet of 3mm MDF). One problem is that there are no window frames for the farmhouse, giving it a rather derelict look, and it lacks the dormer windows on the upper floor and there are no operating doors on the barn (although they can be added as discussed below). The kit was designed for use with toy soldiers and easily modified from its original joined-up buildings to provide a number of separate structures (not all farms in France have a wall all around them, most do not). If cutting the set up as separate buildings you can add extras such as a lean-to or other detailing to make them look different (one of mine had ivy growing up one wall for example; bits of teased out string painted brown for the branches with dried tea-leaves painted green for the bushy stuff). This kit has been off the shelf for a while but I believe it is now back in production. The last one I bought came with all the Airfix Napoleonic figures and some additional parts including a couple of carts and a very large vac-formed base. I have no immediate use for the soldiers but the carts and other bits are handy 'set dressing' for any period.
Dornaplas offer a Stucco Town House and terraced house kits in their OO range that would serve for anywhere in Europe, they are more expensive than Dapol but being newer moulds they are less liable to warping.
There are also a few plastic building kits designed for use with toy soldiers Armourfast offer a rather nice 'French farmhouse' kit at a very reasonable price (and if you leave off the shutters it makes a decent 'British' farm). Somewhat more expensive but rather more comprehensive is the Valiant rapid ruin house, this comes with alternative sections to make it a shop and can be assembled in various ways. It is designed with a ragged join between the upper and lower sections, lifting off the top converts it into a bombed out building (that is why the range is called 'rapid ruin', hopefully it will expand). Valliant figures do not go well with other makes (they are larger than any of the other soldier ranges, which is a pity because they are rather nice) but the building is fine. Italeri used to do a range of buildings with an Italian 'look' but I understand these are not currently in production, they do however still offer their 1/72 WWII Berlin House which is a nice, rather large, 2 story building and a neat little church suitable for anywhere in Europe. They also offer a 'north African house' and selections of broken walling etc. The only problem I have with any of the Italeri kits is cost, I build things to give away and I can never be sure the kiddie will take to it so I prefer cheaper options.
Laser Cut Buildings
Laser cut buildings are made from sheets of MDF with all the parts cut with a laser, you still have to trim them off the 'sprue' and they may need a little sanding to get a good fit but they generally have several layers and so have more of a 3-d appearance than paper buildings but they are generally less realistic than the plastic types. Personally for 'playing toy soldiers' I prefer the type of structures you might use for a diorama, the laser cut buildings often have visible tabs showing (although these can be covered in various ways, for example scan the pieces into a computer, add the detail such as brickwork then print out a paper 'wrapper' to go over the top of the pieces). Laser cut buildings first appeared as model railway buildings and they were expensive but more recently they have been produced specifically for toy soldiers or wargamers and the price has fallen. Those from Sarissa Precision are designed so that each floor is a separate unit, these stack and are aligned with simple tabs. This range comes in plain MDF and requires painting. Empires at War is another firm offering pre-painted kits at very reasonable prices which have removable floors (which I feel produce a better 'look' to the buildings but they may be less convenient for wargaming). Another firm that has now added some 20mm kits to their rage is 4ground and they are nice pre painted wargame buildings made up of individual stacked floors, I might buy a few for myself but they are a little bit pricey to give away.
Resin Buildings
There are a number of firms offering resin cast buildings designed for wargaming in cluding Airfix, and Lancer Miniatures . They are robust but they are expensive so I have never tried them myself.
Linka Building sections
The Linka range consists of a set of rubber moulds for casting plaster sections (if you use casting plaster they are pretty strong). The sections are designed to work together and you make up buildings to your own designs. I haven't used them myself but a friend used them for his wargame models and the results were pretty good.
Detailing home made and kit built buildings
Paper buildings and plastic kits generally have no internal detail but that is well worth adding if playing with toy soldiers as you can put the troops inside the buildings. Wargamers prefer buildings made up of separate floors that can be stacked but I prefer removable internal floors for two-story buildings as they are a lot easier to make from scratch.
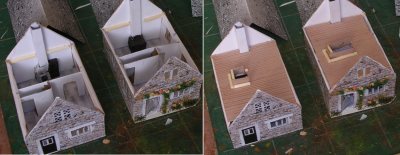
To arrange for a removable upper storey inside a building (plastic or paper/card) you can add internal walls to the ground floor from 40 thou plastic card (or for paper buildings thick card with a printed paper wrapper) and the upper floor can sit on this. The floor has to be very much a rattle-fit as it has to clear things like widow frames which on a plastic model often stick out into the building from the walls (internal walls give better support than just match sticks glued to the inside of the walls). The photo below shows some of the card cottages being fitted with internal walls and upper floors, the large match sticks glued across the end walls also provide support for the upper floor.
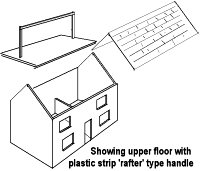
I seldom bother with an attic as it is just too fiddly to use but in the case of the paper cottage kit this was the upper floor of the building. There was no convenient way of adding some internal walls to the attic bedroom so to provide a handle for removing the upper floor I added a U shaped strip of card around the top of the stair well. This was well reinforced with match sticks as it is a toy. If the building does not have internal walls on the upper floor (and you have not bothered with a staircase) you can add 'rafters' in the form of an inverted U shape of card strips to provide a handle for lifting the floor out for access. I have done this on occasion and reinforced the joint at the bottom of each end (for plastic card use scraps of card, for paper card use pieces of match stick).
Another alternative is to use a couple of paper staples, one end folded shut and the other passing through a hole in the floor where it is glued to the under side. The staple method is a bit fiddly to use (it requires a two-handed lift) and is less suitable for kids (or ham fisted adults come to that). Rather more obtrusive but quick and easy is to use a paper clip bent into an 'omega' shape with the feet of the shape glued to the under side of the floor (it is best to glue a scrap of paper over these to prevent the 'handle' being pushed down in use). This looks rough but in this case it is in a farm out building and as the model is really a toy I felt this was acceptable.
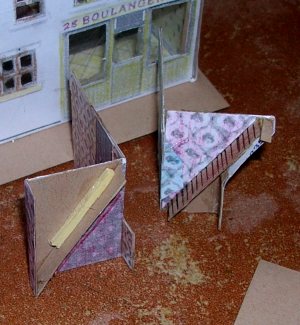
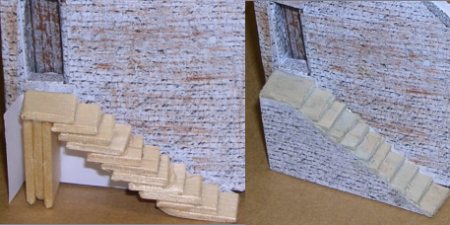
Stairs are easier than you might think, you can of course buy Plastruct, but the cheap ABS type are no longer available and the polystyrene ones, whilst beautifully done, are expensive. If the stairs cannot be clearly seen you can get away with some card marked with horizontal lines. The photo below shows two sets of very narrow stairs being prepared for a row of houses and shops. On the left the stairs are shown upside down, note the match stick glued to the underside for strength, these are for a house so the supporting 'box' is decorated as an under-stairs cupboard. The example on the right is shown right way up, these have a cut-out on the underside as they extend into the shop and I doubt an under stairs cupboard would be much use in a shop. The wallpaper is a pain but can be wrapped round all sorts of joint to give greater strength (these models are being built as toys and are going to take a lot of handling).
If the stairs are more visible I just fold a 6-8mm wide strip of paper concertina-wise and glue this to the wall. If it is to be open you can add a strip of card to the under-side (a coffee stirrer works well as it doesn't warp and ends up nice and strong). If it is likely to be visible you can add a strip of card running up the outside face. You can make the stairs very steep as no one is going to stand on them and they still look okay. A match stick or cocktail stick can be added as a 'post' to support the outer top end (as this is not attached to the floor above this makes it stronger), or you can use a box of card, giving an 'under-stairs cupboard' as shown here. The photos below show the stairs being glued to the inside wall of the box ready for fitting and what they look like when painted and in place.
For earth or stone steps you can glue the folded paper 'stairs' to card and trim this down to the angle of the stairs when dry. You can then use toe nail clippers to clip out the triangles at the side of the steps. I used these folded paper steps in some of the bunkers I built, the example shown below was made, rather crudely, in this way, it gives access to a sandbagged position.
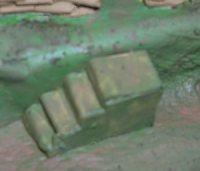
Another option for visible stairs is to use lolly sticks cut into short lengths and stacked against a paper template to get the right angle. If you need a precise set of stairs, such as those inside a building, it is best to mark the stick and use a hammer and chisel to chop them up accurately, you can then cut a rear from corrugated card to get a perfectly even set of stairs. In the example shown below the opposite was required, representing a worn set of stone steps on the out side of a farm outhouse. I added a few scraps of lolly stick to fill in the gap under the stairs a bit then added the outer wrapper of printed paper.
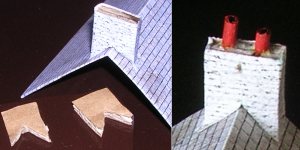
If chimneys are fitted to a removable roof these will be used as 'handles' and hence need to be fairly sturdy and secure. It helps if you arrange these in the centre of the roof rather than at the ends, although the design of the building means this is not always possible if detailing the interior. You can cut a block of balsa and wrap this in brick paper or cover with embossed plastic card but as I didn't have any balsa to hand I used two or three lengths of corrugated cardboard cut and glued together for the paper buildings I made. The chimney pots are lengths of bamboo skewer coloured with a red marker pen, the bottom end was shaved down to a sliver which was inserted into the cardboard, a top dressing of white tissue paper soaked in PVA was added round the base of the pots and a black dot from a magic marker on the top of the pot finishes the job. The base is glued to the roof with lots of Uhu, you can add pins from the inside driven up into the stack to reinforce the joint but I felt that was a bit risky for a toy.
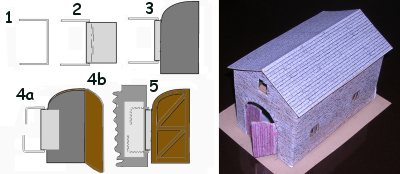
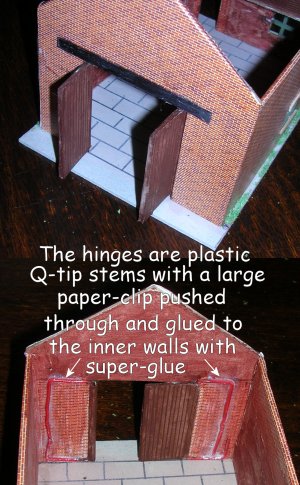
You can add 'working' doors to larger buildings as shown below. You need stiff wire for this, fuse wire or florists wire is not stiff enough. The best is Slaters 20 thou brass wire or thin 'piano wire' (available from many model shops), a (thin) paper clip can be used if you take time to get it dead square but these tend to be rather thick. Take the wire and bend it as shown (1). Smear a trace of Vaselene or similar onto the wire then add a double thickness of paper folded and glued as shown (2). Glue the card door to the paper wrapper (3). Bend the free ends of the wire as shown (4a) and add a cosmetic wrapper (4b). Glue the ends of the wire to the inside of the building doorway, I always add paper and glue over the wire as shown (5) (I do this even when adding a printed interior cladding). The result is working doors, which adds greatly to the 'play value' of the thing. The example shown has these doors (and also a hay loft wherein a plucky British airman (Airfix British ground crew) can hide).
I made a set for one youngster, they were very young so I made the buildings from 2mm 'greyboard' card (80 thou - Difficult to cut as it is so thick but strong enough to survive being tossed into a toy box) The doors were also made from the same thick card, scribed with a ball-point pen to make the planks. For the hinges I super-glued lengths of plastic cotton bud stems to the edge and super-glued a couple of layers of thick turkey foil over that and onto the door itself (this produces something akin to tinplate!). The hinges are long paper clips straightened out and glued to the inside walls with super glue.
You can use this method to make working domestic doors in houses or shops if required, however this is fiddly and an easier option is to glue a strip of thin cloth to the inside to act as a hinge.
Ruined and bombed out buildings
Ruins are popular as they are easy to work with and have a distinctly warlike 'look' but it is worth noting that troops would probably avoid badly damaged buildings if at all possible as they are liable to collapse without warning (and a lot of solders were killed in that way fighting in ruined towns and villages). However in WW2 all sides were fond of plastering a small town with artillery or aerial bombing to kill as many enemy troops as possible, disrupt their communications and ability to move about and hopefully damage any defences they may have set up.
The Germans defended a lot of small towns and they had a standard approach. They would try and seal all doors and windows on the ground floors to make it more difficult for enemy troops to enter the building and their actual defensive positions would be in the centre of town as the outer areas are too easy to attack with artillery or tank guns.
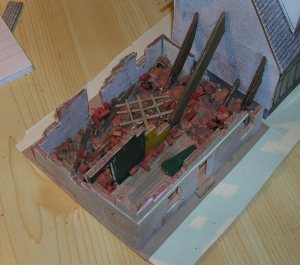
For 'ruined' buildings you really want walls about 5mm thick, which is handy as you can but 5mm foamcore sheets but any thick corrugated cardboard will do (if it is the thin type use two layers glued together, the glue makes that combo very sturdy). As the tops of the walls are visible you should really seal these on cardboard buildings with a strip of brick paper, in the example shown below I didn't bother, just running a red pencil over them. Window frames are pretty robust and often survived but badly broken window frames can be suggested using bits of match stick pushed into the edges of the window frame, top and bottom are easy, for the sides you may need to use the point of a nail first to make a hole.
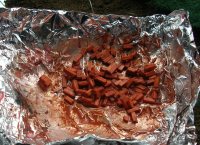
One problem with ruins is the piles of associated rubble and bits of wood. Wargamers put their figures on large bases so they are very stable but when playing toy soldiers the small bases they come with are often annoyingly large and the figures do not cope well with uneven surfaces. The best bet (for playing soldiers) is to paint a 'camouflage' type pattern on the base (use enamels, almost dry-brushing these on, this avoids the base warping). Cut up some standard size match sticks, about ten for a typical 'ruin', and coat these with diluted 'brick' coloured acrylic paint (I think mine were done with burnt ocher), you have to do this after cutting or you will have cream ends on your bricks. I do the painting in a scrap of folded tin foil, leaving the lot to dry out before using them. Some will stick together, but they come apart as you use them.
When dry place small spots of PVA onto the base and position individual 'bricks' on this, leaving little space between them. You can also stain some match sticks dark brown and place these on the floor as 'bits of timber'. These effectively hide the base but they provide a flat surface in the manner of 'crazy paving' on which soldiers can stand. In areas where you are not going to have men standing you add more 'rubble' piled up to hide the flat nature of the other areas. You can add scraps of corrugated card to increase the bulk, but coat this with PVA, if you just place it on a blob it may well fall apart later. Add more 'bricks' to these piles of rubble and add a few details. The roof is the last thing to arrive when a building collapses, so add some of the rafters (I used strips cut from card in the example shown below). In the bomb sites I remember from you childhood there was always a door lying about, so I added one laid up from post card (strips glued to a rectangle of the same card to make a paneled door) but you could just add one of the Dornaplas or Airfix doors.
You can then add more rubble to the outside, piled against the walls, the example shown lacks this as the damage was supposedly done some time ago and the area has been partially cleared (the adjoining building has been propped with timber supports, in this case cut down lolly sticks).
Odd details added to a ruined or damaged building, such as a picture handing on a wall or sections of sagging flooring all add to the atmosphere and make the scene less sterile. I added some details to the interiors of non destroyed buildings as well, domestic clutter helps give a sense of place but confined to the outer walls does not interfere with the placement of toy soldiers. Making the small bits of domestic clutter is discussed separately in the section on Agricultural, Industrial and Domestic Clutter.
The floor sections of damaged buildings can be represented using two pieced of thin card with match stick sandwiched between them. On one building I added a bath tub, resting on the remains of a floor and hanging on by its plumbing (plastic bubble pack from a headache tablet for the bath and some florists rose wire for the pipes).
I made a couple of completely destroyed buildings, just rectangular piles of rubber and bits of plank with odd sections of walling still standing (the wall with the chimney tended to stay up longer than the rest of the building). This avoids the soldiers having to fight from building to building at point blank range.
Corrugated metal structures
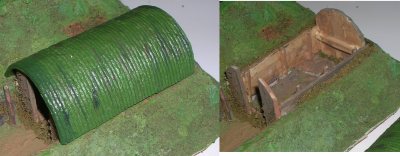
The military used a lot of corrugated metal sheeting for their portable buildings. The photo below shows a stores bunker, the 'corrugated iron' roof was made by wrapping some card round a suitable tube and winding this with string. This was then given a wash of slightly diluted PVA glue, followed when dry by a couple of washes of fast drying PVA varnish and after that had dried a top coat of paint. The same technique can be used to make a flat bit of corrugated iron but it is better to use two bits of card with some Bacofoil between them, when dry you cut down each side to get two pieces. The end and side walls of the bunker are cut down 'lolly sticks' with cocktail stick supports.
This was a modification to an existing trench complex, I used a modeling knife to cut down through the top of the trench sides, flattening the inner walls outward to make space. The new walls and ends were glued in place, some string soaked in PVA was then used to fill in any gaps along the visible join. The edges were then dressed with Dill weed whist the glue was still wet.
The British in particular used a lot of semicircular Nissen huts, invented in 1916 by an Army engineer of that name. The original design was twenty seven feet long by fifteen feet wide and the ends were also made of corrugated iron, with a window in one and a door in the other. These huts could be shipped in 'kit form' and took only a few hours to erect. They had a planked wooden floor and an iron stove was normally fitted somewhere about the middle with its black pipe sticking out through a hole in the roof. The floor was raised slightly above ground level and the sides were often supported on low brick walls, typically twelve inches high. By the 1920s there were three standard sizes of Nissen hut, sixteen, twenty four and thirty feet across the base, all built in six foot long sections. As many sections as required could be bolted together to produce a hut of the required length. The military subsequently developed a variation on the Nissen hut called the Romney hut, which had a tubular metal inner frame. This was thirty five feet across the base and was supplied in multiples of eight foot lengths. The Americans had something similar but I am not sure of the sizes they produced.
To make a 'Nissen' or 'Romney' hut all you need is a suitable size bit of tube as the former. For a standard small hut you need something about two and a half inches (6.4cm) in diameter, I used a 2 litre fizzy pop bottle as the former, I am not sure if it is accurate but it looks alright. It is a good idea to wrap the bottle in a sheet of Bacofoil, secured with sellotape before starting so noting sticks to the plastic. You may find it easier if you put the top on the bottle and clamp this gently in a vice, leaving both your hands free to work.
An A4 sheet will not quite go round this size of bottle, so rather than card I used thick paper (bank statements are good for this). First lay on a sheet of paper round the former and use small tabs of sellotape to secure the ends. Wash this over with a thin coat of diluted PVA glue. Then add another sheet from the other side (so the gaps do not line up). Repeat until you have four or five sheets of paper then set aside to dry (it is easer to add the string to a dry, non-sticky surface).
Secure one end of the string with sellotape, then wind a few loops round the paper and carefully push these together, try to keep them at right angles to the bottle. Then just add a few more loops and repeat until the required length is completed. Once the string is in place wash over with some dilute PVA, leave to partially dry then add some neat PVA and spread this over the string with a wet brush. Leave this to dry.
You can add a couple of top coats of fast drying varnish, I am not sure if this does anything but it is what I used and mine worked. Once all the glue and varnish has dried paint the thing (I used a base coat of acrylic as this also helps hold thing together). I also painted the interior and nothing warped on any of my models.
At this point you can cut the bottom off the bottle and use it to mark a circle onto thick card, put paint on the bottle end and use this to mark the card as the plastic is too soft to reliably draw round. Cut this card carefully in half, you want two matching semicircles for a hut. You should make two sets of ends as you get two buildings from a bottle.
At one end you need two square windows and a door, at the other end I believe it was just two windows. I find the best way to cut windows in card is with a small sharp chisel onto a scrap of wood. The card ends can then be scribed for vertical planking or covered in brick paper (making sure the pattern is square with the base). For a paper covered end the windows and door can be cut corner to corner and the tabs folded through the hole and glued to the inside. Windows can be glazed with clear plastic, add window frames using thin strips of peel-off sticky label before gluing in place. The door can be a scrap of scribed card glued across the inside of the opening.
You can use one of the card ends to mark the dividing line on the string (only at one end, unless you are very careful to get the alignment right), then slip the tube of string and paper off the former and cut it in half lengthways. If all you want is a building you can glue the ends into the main body, this can be lifted off for access to the inside if required. I did it the hard way, attaching the ends to a card base and just having the half-tube sections removable.
Adding the brick base, as used in more permanent installations, requires a strip of wood about 4mm square. Place the hut on a piece of paper and mark all round the base, now make a rectangle from the wood strip to fit just within the marked lines and glue this together. Add a brick paper wrapping to the wooden base frame and place or glue the hut in place. If you have some sheet material about 4mm thick this makes a tidy option as you can add a strip of brick paper folded over the edges and fill the centre of the top with a planked floor made from a brown envelope, the matt inner face is better, with lines drawn on it. Foam core board is 3mm thick (at least where I live) but with a wrapper of brick paper and a top of 'planked' paper it would do.