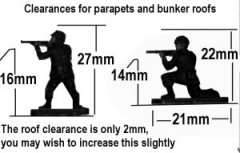
The first point to note when making a trench is that you need to have enough space inside for the figure base. From memory the Airfix kneeling US paratrooper has one of the largest bases, about 21mm from front to back, to allow for errors I used 23mm as the front-to-back depth for the trenches. This is actually quite a wide trench, a two-man 'slit trench' ends up pretty much a square, but as you cannot reasonably ask your little men to get off their bases you are stuck with it. When making a bunker (naturally this will have a removable roof) you have to make sure the frame is tall enough for a little man on his base to stand inside. For Airfix type soldiers, or OO/HO train set people that is just over an inch (about 27mm for Airfix figures)
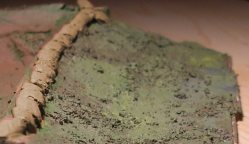
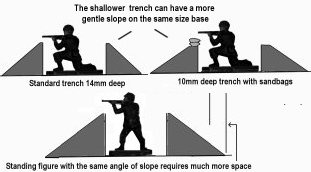
My models were produced for a child playing with toy soldiers, hence they are small self contained items which form somewhat unrealistic 'humps' on the vast plain of the carpet. Things improve if you make the base much larger, allowing a more gradual slope. Keeping the depth of the trench low (so the figure kneeling can just fire over the parapet) also helps. Another dodge is to have the trench very shallow but add a row of sandbags along the top edge, which looks okay when done with care. Sandbags are discussed separately in another section. The photo below shows a shallow sided trench, with a gentle outer slope topped with a row of sandbags.
A third option is to add piled up earth around a 'freshly dug' trench, for which I used dried tea leaves laid down on PVA glue, building up the layers to the required depth. The stuff in tea bags is fine enough to use for 'earth' and when dried is an appropriate colour. A real trench would be chest deep and as several sets of soldiers include men standing and firing (not likely on the battlefield) a few deeper trenches can usefully occupy these chaps (the drawback is the extra space required for the base).
A real-world two-man slit trench is about eight to ten feet long and about two feet front to back, the bottom has a 'grenade sump' at either end and it would be 'improved' by adding a roof over part of it to protect against air-bursts and mortar fire if time allowed. The roof itself would be made from whatever was available, a domestic door, some corrugated iron or just lengths of tree trunk and thick branches. Earth would then be added over that and (if they were there long enough) rocks added on top to help protect against a direct hit from a mortar round. If adding a roof to a trench you can assume the men would crouch down to enter the covered part, when building a bunker you have to make this high enough to accommodate a standing figure.
Making these defensive works is very easy, in an evening you can make more trenches than you need, in a second evening you can make more bunkers than you have room for (at least that was my experience). The basic construction is the same for all these pieces.
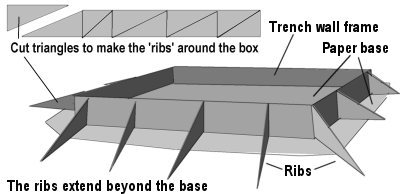
First, for a trench or dugout, cut a strip of card to form the inner wall of the trench, this sets the depth of the hole you end up with (so for a kneeling figure it should be no more than 14mm as shown above).
This is glued, on edge, to a small base of paper, cut slightly larger than the desired trench, forming a simple open topped box. I would suggest adding the glue to the outside of the frame to avoid lumps and bumps in the bottom of the trench.
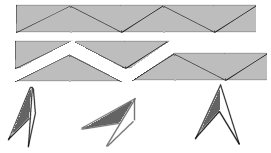
A second strip of card cut to the same width as the wall is then cut diagonally to produce a set of triangular 'ribs' or 'profiles' which will support the surrounding ground. These triangles are glued to the outer sides of the box and the projecting base but extend beyond the base as shown below.
By cutting the profile strip in a zig-zag you get ribs that can be folded in half and the fold glued to the outer wall of the trench, these tend to stay up better than single ribs as the glue dries and so are better if using PVA. All the triangular pieces should be slightly uneven in angle and size as this produces a more realistic undulating effect.
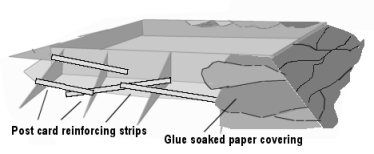
I then usually add strips of thin card across the ribs, glued on with drops of Uhu or PVA on the edges of the ribs as shown below left, this produces a more robust structure. I then mix some PVA with some dark green acrylic paint and water this mix down. Strips of newspaper or bank statements are then brushed with this mix and laid onto the frame (as shown below right). You do not need to soak the paper, a light brush is all that is required.
Bank statements are nice heavy paper and serve well for the lower layers, the newspaper is much thinner and serves better for the top layers as the edges are not so visible. It is best to carry the paper up to the edge of the trench and the ends of the ribs but use the newspaper to extend beyond the edges. The lower edges of the newspaper strip covering should extend slightly beyond the ends of the ribs, at the top the edges can be folded down over the lip of the trench and glued to the inner wall.
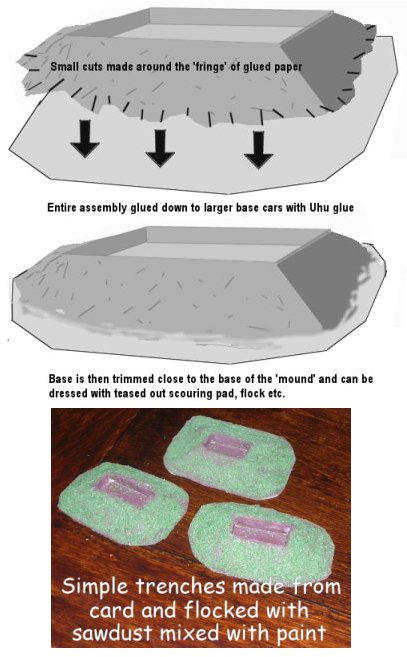
I usually add some dried tea leaves to the top surface and coat this with the glue/paint mix as it gives a quick and easy grassy finish. Let all of this dry then you can paint the interior of the trench (dark earth) and touch up the surrounding ground (shades of green). The result, once it has all dried, is a strong bit of landscape, but the outer edges will be very warped as the glue/paint mix shrinks as it dries.
Leave this to dry then cut into the edges of the outer 'skirt' of glued paper. Now apply a smear of Uhu to the bottom of the paper base of the trench box and the underside of the outer 'skirt', you need very little glue for this. Place the assembly onto a larger piece of pre-painted card, smoothing down the edges (it is best if these are just thin newspaper). It is a good idea to pre-paint the final base as it will probably warp as the paint dries, but you can then iron it flat between two sheets of Bacofoil before attaching the trench to it. Remember to paint along the outside edge of the base to avoid a visible white line on the card edge.
Once this sets (Uhu used sparingly does not normally distort the card base) you can trim the base close by the foot of the mound and apply a dressing of flock or teased out and pre-painted scouring pad using Uhu to hide the join if required.
I have had some success using masking tape in place of paper and glue, tape does not shrink and warp as glued paper does (especially when using PVA or 'gum') but it is not very strong. One option is to add a layer of net curtain material of fly screen over the tape and then coat the outside with a layer of acrylic sealant (you can pre colour it by mixing in some paint). Flock (in my case that is sawdust mixed with paint these days) can be sprinkled over the still wet acrylic sealant and pressed down into it, the sealant grips this well and a final spray or wash with mat varnish seals it well enough for rough play.
Something I have not yet tried myself is to use crumpled kitchen foil to make the base, again covering this and adding flock dressing. I am told the result is sturdy and it is easy to make as there is no cutting card involved (other than perhaps for the lining to the trenches).
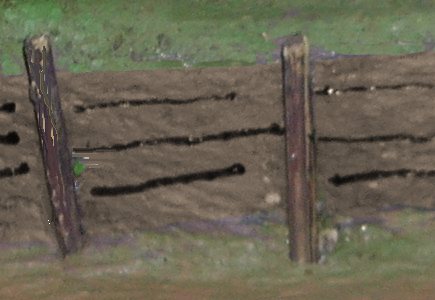
For more robust trenches, where the position has been developed over time, you can add an inner wall of 'planks' (post card scribed horizontally with the back edge of your knife) with match sticks glued on vertically at intervals as supports. This kind of thing would be seen on an established defensive gun position for example. You don't have to add the planking, just make the trench wall smooth, paint it 'wood' colour and add horizontal lines with a fine nibbed black felt tip pen as shown below.
For a longer trench do not use a plain rectangle, trenches had dog-legs in them so a shell hitting one part would not get everyone in the trench. This means you end up with a larger piece but the effect is worth the effort. Mortars sat in more or less circular pits, again with toy soldiers you need to make these larger than the real world examples to accommodate the figure bases, the size depends on the figures you use. Anti-tank gun positions often had associated trenches for the supporting infantry. The example shown below is compressed, in real life being that close to the gun would be uncomfortable at best, but for the purposes of playing soldiers it serves.
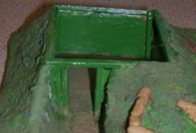
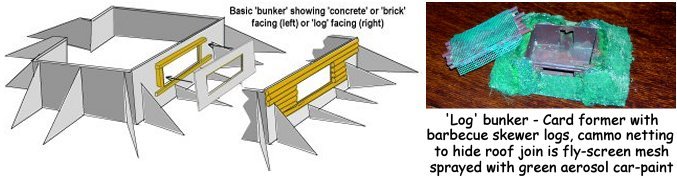
Bunkers tend to be tall as they have to have people standing inside them, however they went down very well with the lad. The example shown below is a command bunker in one corner of a trench complex, there is a frame of extra long matches around the top so that the roof will sit flat on top.
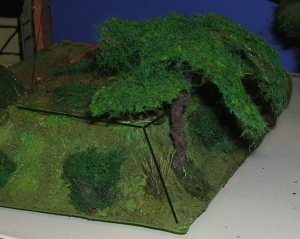
The outer sides of the bunker are steep as otherwise the base would be very large, but this is acceptable if it is not the norm for the pieces. The steep parts can be further disguised by adding some bushes, twist up some wire to make the frame of the bush, punch a hole with a nail into the slope, glue the base of the bush in place, coat with glue and add flocking. You can't get away with too much of the bushes thing though, it starts to look a bit obvious if used on more than a couple of pieces in close proximity. The example shown below has a tree, some bushes and a clump of grass to obscure the steep sided, right-angled corner of a bunker. To make the position more clear I have added black lines along the top of the bunker and down the corner. The antenna in the near left corner of the bunker roof is a bristle from a cheap paint brush (possibly nylon), these also look good on tanks incidentally.
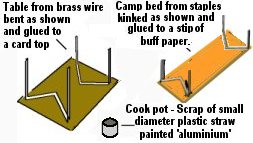
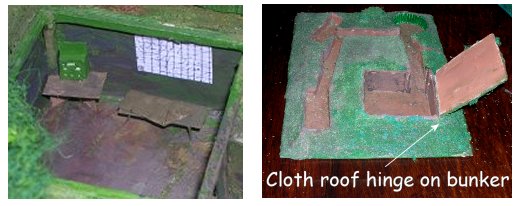
Bunkers look better with a bit of furnishing, glue two bent staples to the under side of a scrap of painted card for a 'camp bed'. A table can be made from some card sitting on a U shape of card glued on edge to the underside. A scrap of paper 25mm x 3mm with a straight 30mm length of brass wire added to each side makes a stretcher. You can cut the helmet or officers cap from an unwanted figure and put this on the table, perhaps with a cook pot. A kit bag hanging on the wall can be made from a scrap of card with some paper wrapped round it, the strap can be thread or a strip of paper (glued to the wall this does not need to be strong) A printed map hanging on the wall looks good in a 'command bunker', and of course the picture of the Great Leader.
Don't overdo it though or there will be problems getting the men inside, chairs can be made using model railway 'signal ladder' but as in real life these get in the way when everyone is standing. Keeping things close to the walls helps, you can prop the camp bed or stretcher up against a wall to make more space. The photo shows a command bunker with map, table, radio and a camp bed. There is still room for a 'command group' inside the bunker. To avoid bunker roofs getting lost on my more recent sets I have added a strip of thin cloth to one side to act as a hinge.
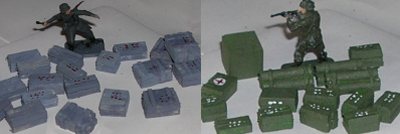
Bunkers and trenches would also contain clutter, mainly in the form of ammunition boxes, where artillery is based there would be spent shell cases and a heavy machine gun position would have a lot of small spent cartridge cases on the floor. The ammunition boxes can be made up using strip wood, many years ago there was an article in Airfix Magazine which stated the sizes of wood required, however mine were all made to 'that looks about right' millimeters. I didn't have much by way of strip wood to hand so I used four, six or eight match sticks glued together with PVA then sawn to length in an Xacto mitre box using a pencil mark on the inside of the box to keep the size consistent. This is not ideal as the ends are difficult to get right and the glue sometimes failed, strip wood is better if you can find it. Large boxes sometimes had external wooden strapping, I represented this with strips of thin card. The boxes were made based on examples seen in photographs, however some proved too small to be useful (two matches cut to length and sanded down to represent the ammunition box for a machine gun ended up too small to be used 'loose' to go with 'toy soldiers'). Artillery using 'fixed round' ammunition often had the shells delivered in a tube, in the case of the British and Americans at least some of these were made of wicker-work and they were often strapped together in threes. The Germans also supplied some rounds in tubes as well as in boxes, however I didn't come across any photos of these. A single tube would probably just get lost so I made sets of three tubes by gluing three bamboo skewers and leaving them to set before cutting them to length in the Xacto mitre box, again using a pencil mark to get a consistent size. This is definitely easier than cutting a single length and gluing these together, I know because I tried that as well. At each end of the triplet I added a paper strip, cut with a ruler using a sharp knife, to represent the straps holding them together. Lettering was just dots added using red and black felt tip (fine tipped CD markers) or a white 'gel pen'. Photographs of artillery position show a lot of boxes piled up and lying around to position, these can be used to determine the size of strip wood to use. The photos show a small selection of the boxes and tubes produced, you need more of these than you might think, plan on spending an evening making them.
Spent shell cases are easily made using lengths of plastic rod, paint with Humbrol 'brass', cut to length, paint one end brass and the other black (to represent the hole where the shell used to be). These are glued in a pile on a scrap of card, after doctoring the card to represent the ground, in my case 'flock' of dried tea leaves painted green. I also used thin (cheap) cocktail sticks for some piles, cut to about 12mm these are about right for 88mm gun cases and look right beside to a tank when it is in a stationary hull-down position. Machine gun spent cases are lots of thin plastic rod painted brass and cut against a ruler at about 1mm intervals. Very tedious to make but its the sort of detail that catches the eye.
For bunkers with firing ports you should set up the figures and guns to be used and prepare the inner wall of the bunker checking it against these to make sure everything will fit. It is also a lot easier to cut out apertures in the wall when you can lay the strip flat to do it. The openings will end up rather larger than on a real life example to accommodate different figures and guns, but they still look okay.
To add depth to the openings you can add a frame of match sticks with a card outer frame glued to that, the edges are blended in as the glued paper strips are applied to the ribs. An easier option is to use cut-down cocktail sticks or bamboo barbecue skewers glued to the outside to represent a log built bunker. To add a 'bark' effect scrape the sticks along a coarse threaded bolt. It is worth noting that the bamboo barbecue skewers are thicker than cocktail sticks, this saves time and effort when adding this kind of cladding (and looks heavier, better for a bunker front than the cocktail sticks). For the roof of the bunker the best option is 40 thou plastic card or thin plywood, paper card roofs tend to warp when you add scenic dressings (although gluing some lengths of bamboo skewer or extra long matches to them helps prevent this). With my level of skill the join between the roof and the body of the bunker is usually visible but adding scraps of thin cloth to the edges of the roof, covered with scatter to match the bunker, helped break up the straight edge. Another option is to use plastic mesh 'fly screen', it is best to wash this with detergent then spray it with green aerosol car paint (that seems to be the best paint for this plastic material). The netting can be glued to the bunker at the front or rear to act as a hinge and prevent the roof sections from several bunkers getting mixed up but the example shown was a one-of so the roof is not attached. The camera has shifted the colours a bit in this illustration, the greens are not nearly so vivid to the eye.
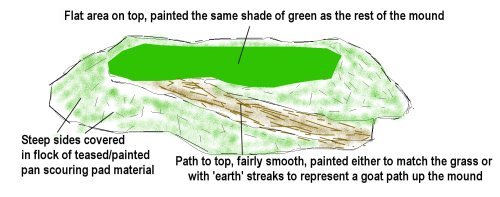
You can use the same basic construction method to make hills and the like, handy to hide behind but difficult to stand little soldiers on. You can of course add flat bits to said hills to put the men on if required. The sketch below shows one approach, giving a visible route to the top where areas are left un-flocked so soldiers can stand on them. This sort of hill, with occasional flat patches, looks more realistic than the ziggurat (stepped pyramid) type often used for war gaming and is better for just playing toy soldiers. The smooth path running up one long side at a gentle angle allows soldiers to sneak or charge up the hill without falling over (and is also more realistic).
For larger hills use corrugated cardboard box material for the ribs, this is much stronger then cornflake packets although more difficult to cut into pleasing curves. To hold the ribs together you can add vertical strips of card between them. All the strips between any two ribs should be the same width, cut from a single strip, to keep the ribs parallel. Alternatively you can push cocktail sticks or bamboo barbecue skewers through them (glue the skewers in place with Uhu or PVA).
At the ends of the piece add profiles glued at right angles to the end rib, these can be reinforced by pushing a cocktail stick at an angle through the end piece and the main rib. Having pushed the bamboo and/or cocktail sticks through the cardboard you can trim off the points with a pair of wire cutters. As they are all running near the horizontal you will not have any nasty accidents if someone heavy falls onto the thing.
I would suggest adding strips of cornflake packet card as the first layer of the paper covering on a larger hill type item. Finish off with good paper topped off with newspaper as described above.
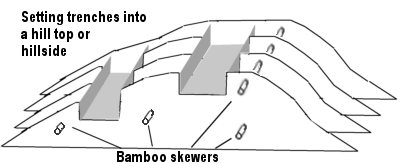
It would be quite okay to add some trenches to the top of the hill, the troops might retire to the reverse face of the hill (away from the enemy) during a bombardment, returning to the trenches when the enemy infantry attacked. Trenches and particularly observation posts would be more likely set into the face of the hill, below the skyline. Either can be arranged by cutting a suitable notch into the ribs forming the basic structure and adding a floor and walls to these from card (thick paper will do if the ribs are close together) before adding the covering of glued/painted paper to the hill.
This type of hill is very strong, it will not just collapse under the weight of a person, but it remains very light.
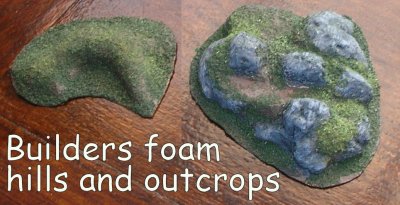
More recently I have been using an idea picked up from Alan Plumb (who posts on YouTube as 'shed engineering'), he built a model railway and used builder's expanding foam to make up the hills and the results looked very good. I tried laying out some bin-bags on the lawn and squirting the foam onto them in blobs a few inches across. I found you really need to lay out several bags and use the whole tin as the foam tends to dry in the nozzle even if you upend the tin and spray it until only propellant comes out. Leave the resulting blobs to set then use a knife to cut them across horizontally, you get a 'lumpy' side and a 'smooth' side (where it expanded against the bin bag on the soft grass). I carved the lumpy side about to provide places for the troops to stand, the result is a sort of 'rocky outcropping'. Both parts were then stuck down to card with PVA and left to dry. To finish them off I mixed up some white acrylic sealant (it has to be acrylic not silicone) with some black paint to produce a grey mix and brushed this over the hills (use a 2" paintbrush for this, it can be washed clean with water before the sealant sets). Whilst this was still wet I sprinkled dyed sawdust in appropriate areas, leaving a few grey bits showing for the rocky outcrop, the sawdust was gently tapped down and stuck down well in the sealant. I dry-brushed the rocks with lighter grey paint and sealed everything with spray varnish (which doesn't seem to contract and cause warping).
Hills help avoid the problem of hiding on a vast expanse of carpeting although they do occupy quite a lot of room. Having a sheer rock face on one side reduces the overall size for a given height. It is worth making a few quite large hills with no direct military purpose, these serve as set dressing and things to hide behind. You can include one with a road running over the top and another with the road running in a cutting through the hill (good for ambushing people).